Paypal is the most widely used and most secured online payment processor in our days. Adding a Paypal payment method to your website is becoming more and more easy.
While the platform itself gives a facility for users to click, fill a form and generate payment buttons for the websites, there are payment plugins here and there for WordPress websites and one of these is the most powerful WP form plugin called WPForms.
For developers, Paypal has a bunch of APIs allowing you to develop complex payment apps and collect payment with Paypal.
Recommended: Paypal Money Adder 2020 SCAM ALERT – Read this First!
How to collect Paypal Payments on your WP site if you are not a developer
Let’s look at two common ways you can allow your site visitors to make payment with Paypal. First, here are the different types of payment you may want to implement:
- Donations with the donation button
- Subscription for a service with the subscription button
- Sells of an item/service
So how do you do this?
1. Without a plugin
You are able to implement paypal payment with no coding skills and without a plugin on your WordPress blog. What you need to do is go to your paypal account and generate the payment button.
Go to Paypal buttons:
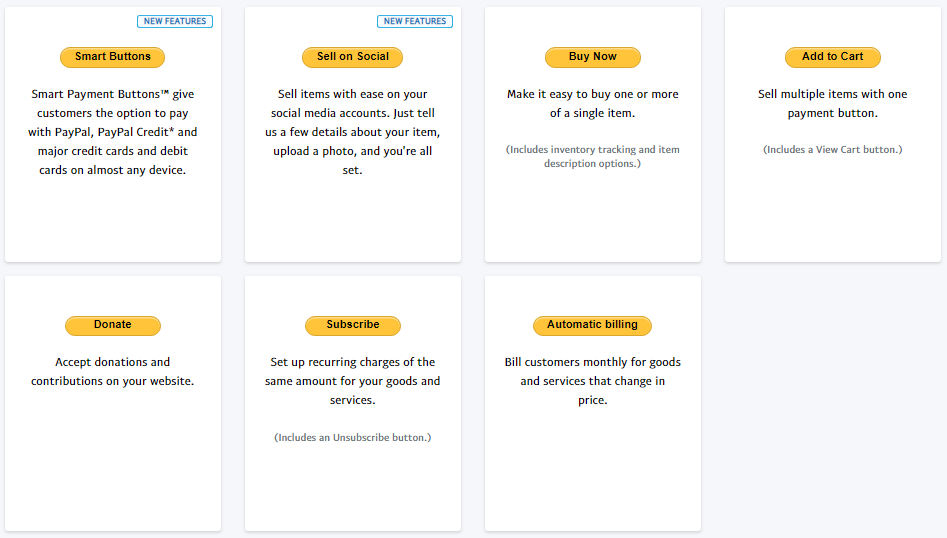
Go ahead and select the specific button type you want for your payment. Let’s go with the Buy Now button as an example.
This will take you to the next page for some payment options:
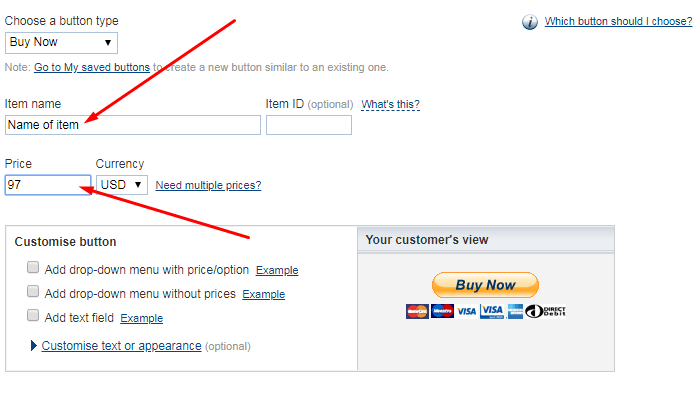
Enter the name and price of the item. You may want to leave everything else as it is but entering the item ID may help make tracking easier.
Depending on what you sell, you may want to set up more options. Let’s look at something quite interesting under step 3: Customize advanced features (optional)
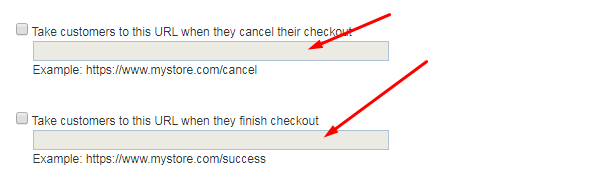
When a site visitor clicks on the button to make some payment, one of two things will happen:
- Cancel the transaction: If that happens by the reader clicking on the button to abort the payment process, Paypal allows you to redirect the buyer to another page. Strategically, this may be a page with a hidden, last chance discount.
- Finish Checkout: What every marketer wants is for the buyer to finish the checkout process and complete payment. If this happens, Paypal allows you to set a page where the buyer will be redirected to. For digital products, this could be a download page, signup page, thank you page, etc
Once you have your settings in place, click the Create Button button. copy the HTML code to the text view of your WordPress editor:
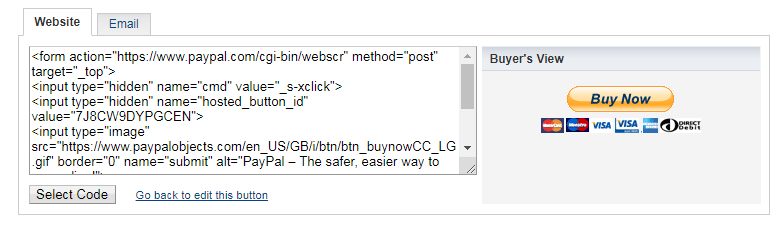
If you want a simple link to send in email, link on text or image, click the Email tab. On the side of the Buyer’s View, Paypal shows you what the button looks like on your website. If you have any advanced html skills, you may design and use your own buttons.
Now, going through this Paypal button generation steps may be daunting. I understand for newbies, this may sound like some strange language. To make it harder, Paypal support staff will never show up to help in this integration. That means you’ll have to hire a developer to do it for you. what if we look at the second approach which is more friendly?
2. Use a WordPress plugin
Using a wordpress plugin is a more friendly way to accept Paypal Payment on your wordpress blog. You don’t have to mess up with HTML tags from your Paypal account.
What you do is follow simple steps and the payment option is available for use.
I’m going to recomment WPForms for Paypal payment. Let me tell you why:
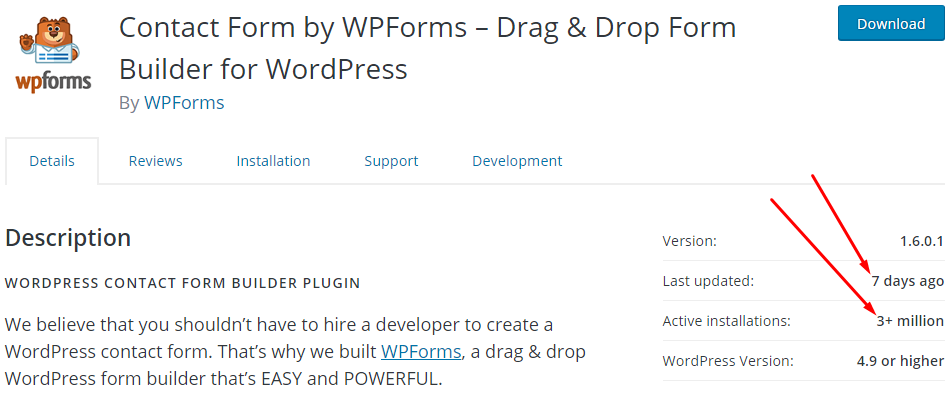
a. This is the most advanced form plugin for WordPress. With it, you are going to be able to turn your WordPress site into a full interactive site. You will be able to create just any form of your choice. Get the plugin for Paypal payment and discover the depth of its riches.
b. More than 3 million WordPress users are not wrong to have chosen this plugin for their forms and Paypal payment:
c. The team behind the plugin is one of the reasons to trust this plugin. They are constantly updating the plugin, adding new features for free, and keeping it tested with the current version of WordPress.
d. The team will be there anything to sort out issues that may not allow the plugin to function smoothly. That’s one of the reasons I stick to the plugin.
Here are other ways to use WPForms:
- How to Connect Stripe With WordPress Payment Form in 3 Quick Steps
- 5 easy steps to create Billing/Order Forms in WordPress!
- How to capture partial data from abandoned form in WordPress in 4 steps!
- Electronic Signatures : How to create a signature form in WordPress!
- How to Create Quick and Easy Conversational Forms in WordPress
- 3 ways to stop spammers from messing up your WP Contact forms
Accepting Paypal Payment on your WordPress site with WPForms
Now, we’ve established that this wordpress is far beyond your needs for a Paypal Payment system for your WordPress blog. While you have endless web forms related to ways to use the plugin, let me walk you through using it to accept PayPal payment.
The first thing is to get the plugin. Click here for details. Take advantage of the current promotion:

If you want more information about the plugin features and use cases, take a look at this page
Once you have a copy of the plugin, follow these instructions on how to install and setup
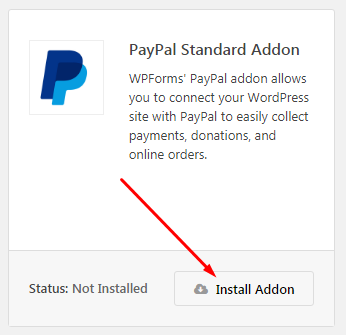
Install the Paypal Addon
The core of the WPForms plugin doesn’t come with the Paypal payment functionalities. But once you have it installed, follow these steps to activate Paypal Payment.
Go to WPFroms -> Addons on the left tool bar of your dashboard.
Locate the Paypal Standard Addon and click the button to install:
Once installed, move ahead to add a new Paypal Payment form. Go to WPForms -> Add New
This will allow you to easily:
- sell digital downloads
- create order forms for physical products
- collect pre-payments for services
- add a simple donation form to your site
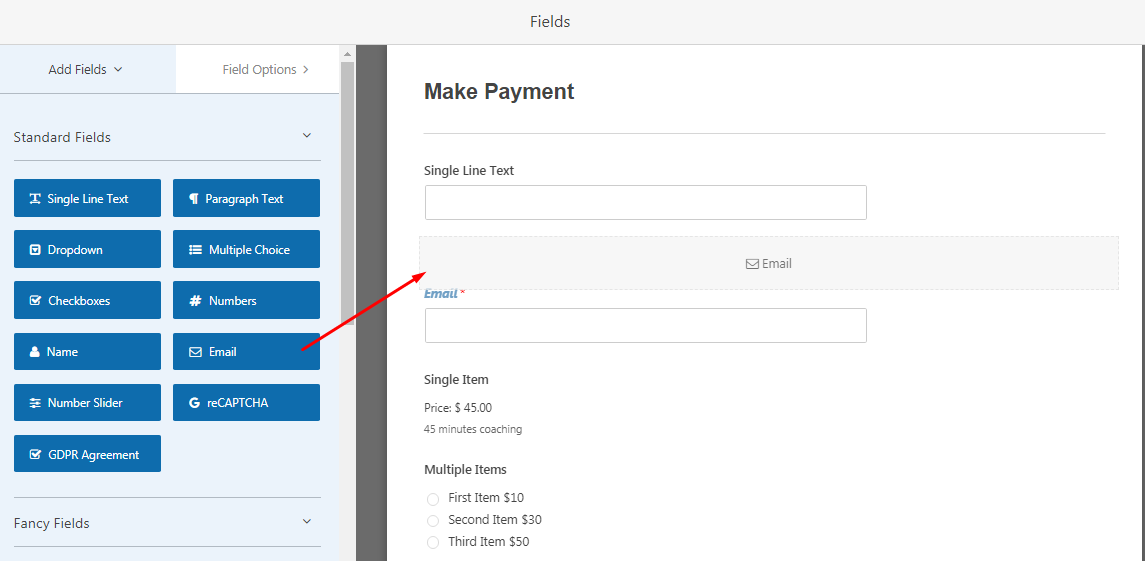
On the new form creation page, enter the form name (for internal use). You may want to move on from the Donation or Order form templates or simply start a new from from scratch.
Add your form fields as required. Use the drag & drop form builder:
Move down to the Payment fields, drag and drop payment options to the form:
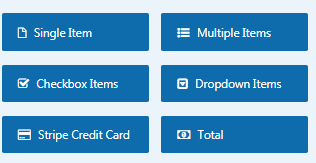
Drag the Total element and drop on the form. This will display the total to be paid by the visitor as he selects different price options. Once you are done with creating your payment form, you’ll have to go and configure your Paypal Payment.
Click Payments – > Paypal Standards on the form builder:
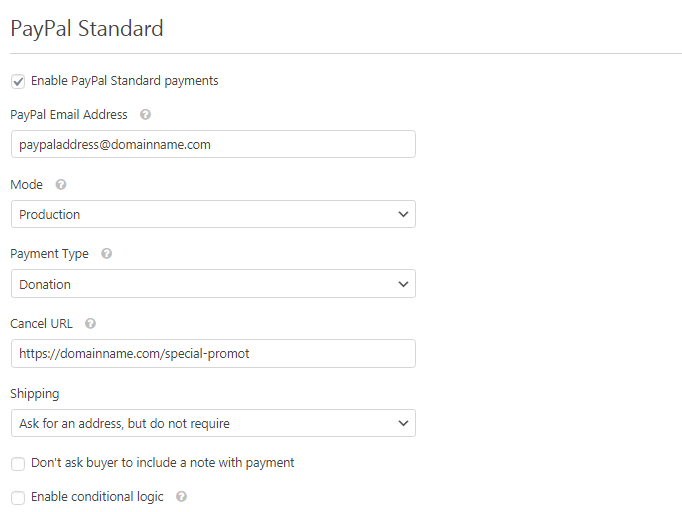
You must click to Enable Paypal Standard Payment for it to work on your form. Enter your Paypal Email in the PayPal Email Address field.
There are two modes:
- Production: Select this mode if you want to go live and start collecting money.
- Test/Sandbox: Select this if you are testing the form. No money will be transacted.
For Payment Type, we have Donation and Products & Services. Pick any that fits your payment type. Just like the case in Payment payment without plugin as I described above, enter the cancellation url. in the Cancel URL field.
Other fields should be set depending on how you want to collect the payment from the visitor. Note that data from the payment form is stored on your WordPress Dashboard. Go to WPForms -> Enteries
How to add the Payment Form to your WordPress blog
Adding the payment form to your page is practical and easy. Located at top right corner of your form builder window, click the EMBED button and grab the short code. Paste this anywhere on your WordPress site.
Alternatively, Click the Add Form button on your WordPress text editor. this will bring up a list of forms created with the WPForms plugin:
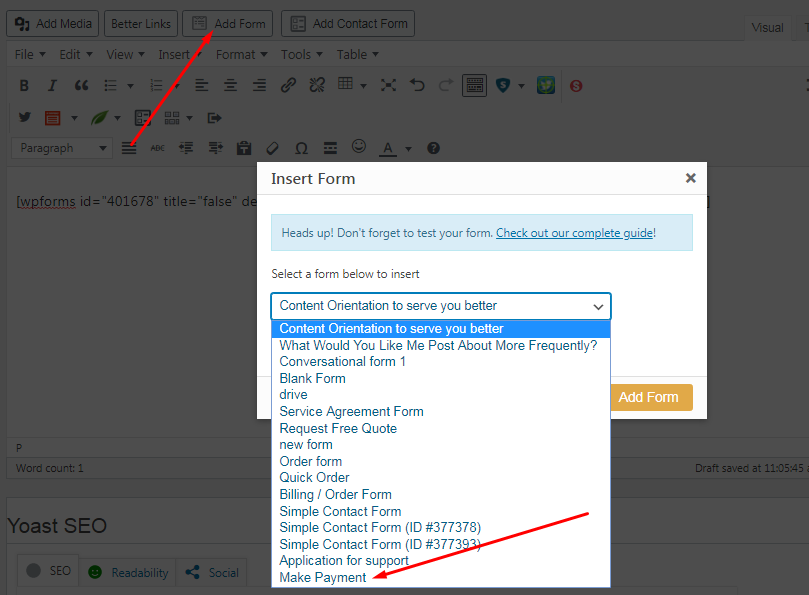
On the list of forms, you are going to see your payment form you just created. The name to be displayed is the form name you entered for internal use. Note that this is also available for Gutenberg users.
To use a plugin or not
From all indications, using a plugin (WPForms) comes with a long list of benefits. While you are able to quickly create a Payment payment form, you have a wide variety of other forms to create with the plugin.
Comments are closed.