BroadedNet has been around since September 2014 principally for WordPress users. My first attempt at getting it work for blogger and other CMS platforms failed.
The Javascript/jQuery developer I hired had some issues finishing his API. So I got another guy who did a job that deserves a positive mark.
So if your blog is running on Blogger/Blogspot, your may want to go try this out so you can be part of the growing community.
It will run on a blogger/blogspot sub domain like this one or personal domain like this and this and this
NB: Since the blogger API is loaded asynchronously (only after your site has finished loading), it will not slow down your site.
Some questions questions I answer always are:
- Is BroadedNet Search Engine Friendly?
- Is my Adsense Account save?
The answer is a big YES. I have explained how this functions so check out this post for details
How to install BroadedNet on Blogger/Blogspot
As a matter of fact, installing BroadedNet on your blogger/Blogspot blog is very easy. First, create a free account on BroadedNet. If you are already a member, simply sign in.
While in your account, click Integrate. Then follow instructions on the form to generate the html script.
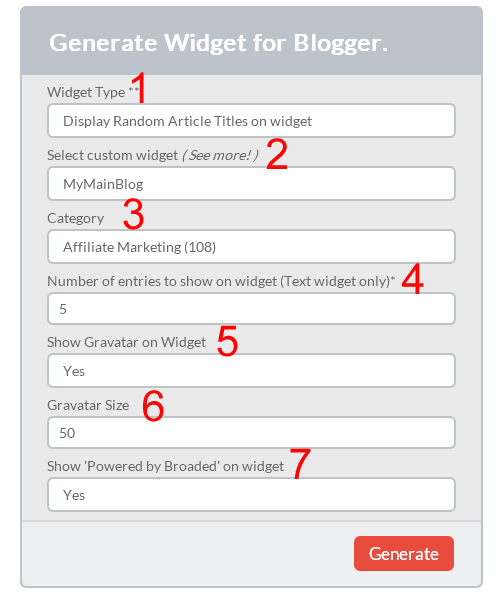
Let’s look at these options in more details. Note that this is specific for version 1.3
1 – Widget Type:
There are 3 different types of content to show on the widget on your blog. The first and most commonly used is the Random Article Titles. If you select this option, BroadedNet will randomly pick articles from the platform and show on the widget on your blog. This of course will be within the chosen category.
The second widget type is “Articles From My Custom Widget” In this option, you may want to pre-select the articles to show on your blog. That means you control whatt’s shown on your blog. You can read more about custom widgets and how to create them in this post
The Third widget type is banners. There are banners of different sizes so be sure to select the most perfect fit for the chosen position on your blog.
2 – Select Custom Widget
If in option 1 above you selected to show content from custom widget, pick the custom widget from the list in point 2. Discard this option if you did not select custom widget.
3 – Category
This is as simple as it sounds. You must select a category that closely relate to your niche. Don’t be a weight loss blogger who wants to promote dog training articles on the BroadedNet widget.
4 – Number of entries to show on widget (Text widget only)
This option does not apply to Banner Widget time. It defines the number of articles to show on your widget. Please note that the Stick Posts will occupy the first 2 positions on the widgets. Read more about Sticky Posts here
5 – Show Gravatar on Widget
If you want gravatar to be shown on the widget, select YES at this level. Read this post for about the gravatar option introduced in version 1.3
6 – Gravatar Size
Set the size of the gravatar according to your design need. The maximum is 80 and minimum is 30.
7 – Show ‘Powered by Broaded’ on widget
Activate this option to show some love. This will add a “powered by Broaded” link below the widget on your blog.
That’s is!
go ahead and add it to your blog and drop the link to your blog in the comment box below
Free Credit Coupon
Here are free credits to start your Blogger/BlogSpot journey. WordPress bloggers can also benefit from this offer. Just share this blog post below and unlock the coupon code!
Thanks for sharing this post. Here is coupon code: BAPI
Let me know how your experience has been with BroadedNet so far. Is this your first time? Drop a comment in the comment box below.
Comments are closed.