Optimizing your blog for fast loading speed and high performance is a must in WordPress. Of course, that doesn’t mean every other site is left out.
As long as search engines and human readers are involved, high speed and usability are top priorities. Generally, if your blog takes over 2 seconds to load, this is considered slow. 3 seconds and above is very slow. With the mad rush for plugins, your new blog which should normally load under 1 second will soon be graded “very slow”. That’s why I highly recommend being so selective when installing new plugins is concerned.
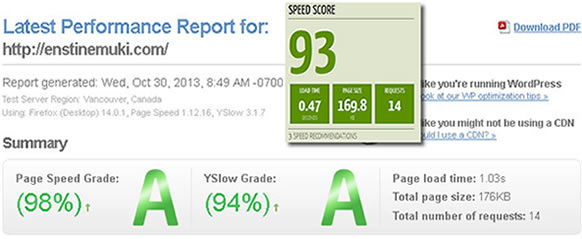
This blog (at the moment of writing this post) takes less than 1 second to load and it’s graded 99% by Google PageSpeed. There are actually 13 active plugins, 7 of which are listed and recommended in this post
Here is an image of Gtmetrix performance test results for this blog I captured on the 30th Oct 2013. The figure 93 is score by QuickSprout performance tool.
As a matter of fact, page loading speed is one of Google’s 200 ranking factor. Not only that. Bing also is said to use this parameter as a ranking factor. Though this factor is graded below content usability, it’s important to give it its place. Neglecting it and having a blog that takes 20 seconds to load can really be a bad experience.
In this post, which is Part 9 in our series to create a blog that makes money, we are looking at WordPress Performance and speed optimization. If you missed the first 8 parts, refer to the front page for a table of contents
WordPress Performance and speed optimization
There are many factors that affect the performance of your blog. Some are purely server-bases and extremely without your control until you choose to switch host. There are dozens of potential factors which may slow down the response of your server: slow application logic, slow database queries, slow routing, etc. See details of these factors here.
Other factors include your theme, plugins, poorly optimized images, too many http requests, too many Cascading Style Sheets files, too many JavaScript files loaded at the head of your pages, etc.
While HostGator’s shared servers loads under 0.30 seconds, there are a couple of things I recommend you do at your end to keep your blog under 1 second.
Before I get into some more details, here is Google PageSpeed insights for this blog (at the time of writing this post). 92% for Mobile and 98% for desktop are pretty interesting stats. Remember this blog is hosted by WPX Hosting and runs on Genesis Framework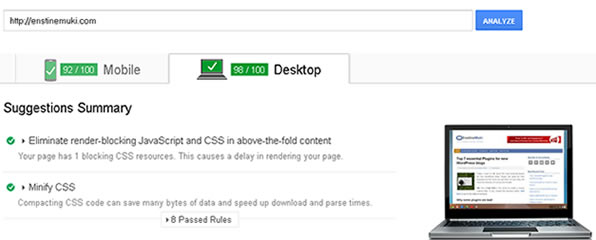
My exact steps at optimizing my blog
Without mixing words, the very first step at achieving green grades is getting the right host and the right theme. I have opted for WPX Hosting and Thrive Themes. The result is what you see for yourself. In this post on choosing the right host for your WordPress blog, I dish out some reasons why WPX Hosting should be your number 1 choice. Again in this other post in the series, see why Genesis is the top theme framework to go with.
The next step is getting the right plugins. At this spot, I recommend 2 plugins that will do the magic. I have mentioned them in my list of 7 most recommended plugins for a new blog. Let’s see these 2 plugins:
W3 Total Cache
This is one of the most recommended WordPress Performance Optimization (WPO) framework designed to improve user experience and page speed.
To install this plugin, go download it from WordPress here or simply follow these steps to get it installed;
- Point your mouse to “Plugins” on the left menu in the admin area and click “Add New“
- Enter w3 total cache in the search field and click “Search Plugins“
- The plugin should be the first on the list. Just click “Install Now” and then activate it.
After installation and activation, you should see a new menu item on the left bar. Point to “Perfomance” and click “General Settings” and make sure the following items are enabled:
- Page Cache
- Minify
- Object Cache
- Browser Cache
- Database Cache
NB: For the most part, the default settings will work fine and produce most desired results.
Getting the best our of it all – Link to a CDN
 “A content delivery network or content distribution network (CDN) is a large distributed system of servers deployed in multiple data centers across the Internet. The goal of a CDN is to serve content to end-users with high availability and high performance.” WikiPedia
W3 total cache makes it easy to hook up with a CDN service. Sign up with a CDN service. The most recommended and endorsed is MaxCDN.
“Sign up to give your website the speed + reliability it needs”
Now, you will need your Authorization key from your MaxCDN account to link your blog. Simply, on your Performance settings page, move to the CDN tab and enable MaxCDN.
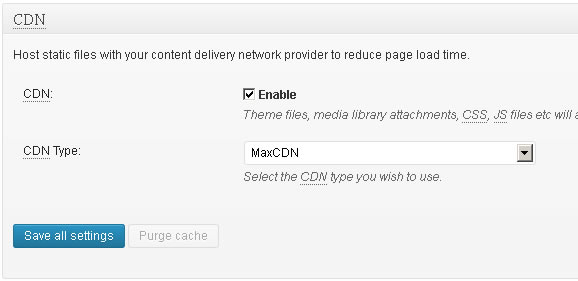 Click “Save All settings” and follow on screen instructions to link up to MaxCDN. While you can get the recommended basic package from MaxCDN for $9/month, there is another free option with CloudFlare. I recommend you signup to CloudFlare from your HostGator cPanel. The reason is that integration and setup will be quite simple, requiring little from your end.
Optimizing your images for high speed
Images are important component of webpages. The virtual importance of images and pictures on a web page cannot be compromised. While we love these media features, it’s crucial not to let them become a ranking and usability issue. Here are three things to do:
- Get premium images.
- Give them the required sizes for your page
- Optimize them for fast loading.
While I won’t be talking about where to get images in this post, I will encourage you consider trimming your images to the required sizes before uploading them to your blog. While Genesis themes will automatically fit your images into theme position, I recommend using your image processing software to trim and re-size your image files accordingly.
Secondly, you’ll need to prepare the images for the web by doing a “lossless” optimization. There are two ways to get this done:
- Use Smushit.com to optimize before uploading to your blog.
- Get the wp SmushIt plugin which will automatically optimize your images on upload
Lazy Loading
Simply put and for fast understanding, this means loading images when they are being displayed on the screen. For instance, when you visit a web page, the images at the bottom of the page will not be loaded until the page is scrolled up to the portion where the images are.
The simplest way to get this done on your blog is to get a lazy load plugin. I don’t use any on my blog right now but if you need it, search the WordPress plugin directory.
Using CSS Sprites
This technology combines your theme images into one image file. This will considerably reduce the number of requests made to the server, thereby increasing your load speed a great deal. SpriteMe is a service that facilitates creating CSS sprites for your blog. Check out this tutorial on how to implement css sprite
Blog optimization recommendation tools
There are three tools I recommend you use. These will give you more recommendations on how to get the best.
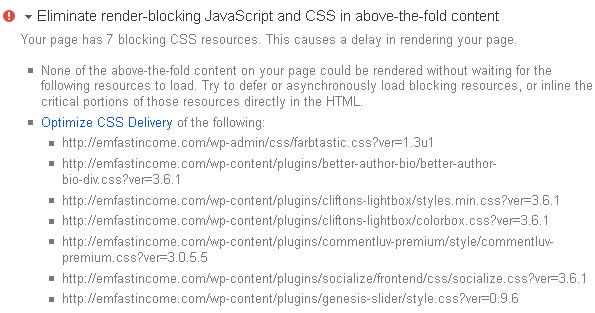
1 – > Google Page Speed
I love the details I get from this tool. It gives specific recommendations and tips on what to do.
 2 -> Gtmetrix.com
This tool goes a bit ahead and gets your images optimized for you. What you have to do is just download the optimized version and replace the copy on your blog. I do this with an FTP application.
This tool also points out the different images on your blog that are missing width and/or height attributes giving you their different dimensions (Widths and heights).
Not giving these attributes (Widths and heights) manually is telling your browser to do the calculations. This makes it slow in the process.

3 -> QuickSprout
This is another exceptionally good speed tool by Neil Patel. According to Neil, this tool alone is costing him $105 000, yet he is making it free. The tool analyses your blog and brings up many detailed reports with performance recommendations categorized into High, Medium and Low categories
Conclusion
I want you to know that optimizing your blog is never and ending process. As long as you keep publishing content and adding plugins, you need to constantly run performance tests and carry out some tasks.
That’s it for this part 9 on WordPress Performance and speed optimization. In part 10, we will see some essential pages to create on your money making blog. Leave your thoughts in the comment box and share this post on social media.
Comments are closed.