CashDonator is a smart WordPress plugin just to help you make money. I developed this tool for WordPress bloggers who want smart ways to generate income from their blogs.
Nb: This post is to compliment this one where I wrote on how to get paid $500+ per sponsored campaign. I mentioned about using CashDonator to create review boxes on different pages to give more exposure to your clients. So here,we see how to create those boxes.
There are different ways you can use CashDonator on your blog – collect donations through Paypal, sell your own stuff through Paypal, insert newsletter opt-in forms on post content, publish banners on post content, create review boxes on your blog and add Adsense ads on your blog.
For the most part, all you will need is to copy and past code snippet, then select options to position the boxes.
cashdonator-exclusive
There are two ways I’m gradually positioning my blog for huge earnings in the future;
- Creating SEO friendly articles.
- Placing affiliate banners and review boxes on these articles.
I also use CashDonator to get paid instantly. This is simply by creating review boxes for my sponsored posts clients. It’s a great way to give them visibility on more than one page on my blog.
Here is the point …
Whenever you create a sponsored post, the advertiser only gets visibility on that paid post. But CashDonator will help expand his reach. That’s just what I want to share in this post.
Here are a few ways this pluggin will help you make money;
- Create and sell review boxes on blog posts.
- Create boxes to review affiliate products (Very powerful – generates lots of sales)
- Create boxes to expand clients’ visibility and charge higher per review post.
- Sell your own stuffs and keep 100% profit.
- Create boxes for affiliate banners.
- Create boxes for Adsense.
Your brain is just your limit how you can use this plugin to milk money from your blog.
Create Affiliate/review boxes! Make money
Ok I’m going to walk you through creating review/affiliate boxes with this plugin and placing them on your posts.
There are 5 elements on each box we want to look at;
- The box title.
- The box thumbnail.
- The box description
- The box link text.
First let’s look at how to create a box.
While in your WordPress dashboard, point to Settings -> Cashdonator
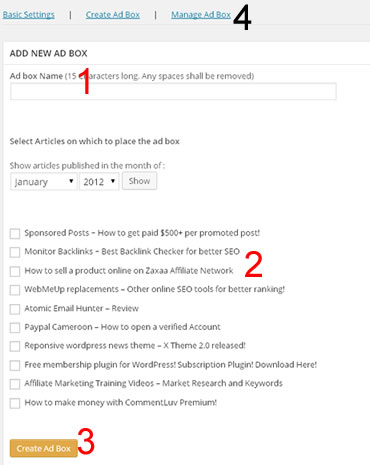
In the image above…
1 – Name your box. This is not viewed publicly. It’s simply a name to distinguish your boxes.
2 – Select 1 or more articles to display the box. However, you will still be able to add more articles.
3 – Click button to create box.
4 – click this link to manage boxes.
NB: To create a box to sell your stuff or collect donation, you will need to go to Basic Settings first where you will be required to enter your Paypal account details.
Now, for the sake of this post, I have created a box called cashdemo. If you have the plugin already, go ahead and create a box with same name so we can flow together.
On the Manage Ad Box page, you should find your box listed on top. If this is your first box, you definitely will not find more than 1 on the list.
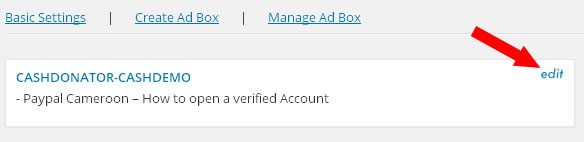
You notice that the box name is now CASHDONATOR-CASHDEMO with the plugin name prepended to what you provided as name of the box. So go ahead and click the edit link and let’s start real work.
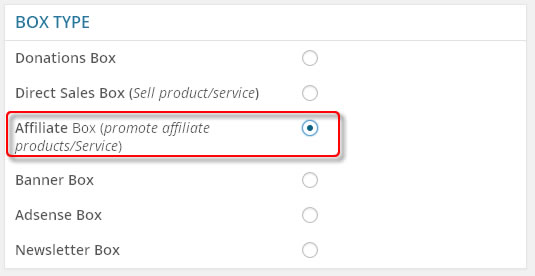
On the box editing page, the first thing to do is to tell CashDonator the type of box we are creating. In this demo, we are creating an Affiliate Box type.
So go ahead and check the Affiliate Box option on the list.
URL of the product promoted!
The next thing to do is enter the url to the product you want to promote. In this multipurpose form, we are picking just the items that work for this box type – Affiliate Box type. So move down a bit to the area where it says “Your Affiliate Link“ and enter the url.
Box title, description height, width, thumbnail
Now move down, skipping every other settings to the area tagged BOX SETTINGS
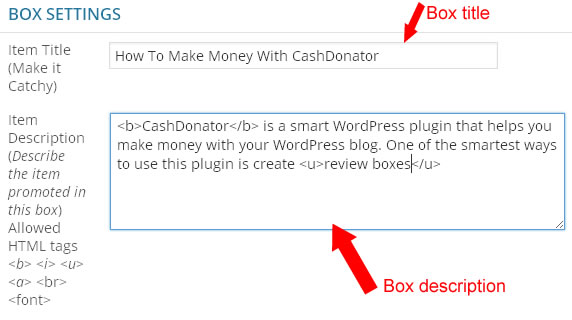
Type in an attractive box title. Remember, that’s one of the first things readers will see and read. The more attract and relevant the title, the more clicks you get.
Then provide some description of the product you are promoting. In this description input field, you are allowed to use some html tags – bold, underline, hyperlink, etc.
You can also add a thumbnail or logo to the box. To do this, just copy the image file url and paste in the thumbnail form field.
There are other areas of the box you have to adjust to match with your blog design;
- Box width and height
- Image (thumbnail) width and height too.
- Box background color.
- Box border color.
- Box title color.
- Box title underline – yes/no
- Box description text color.
Now, you see this is quite flexible to help you give a desired design and color to your box.
NB: Check out this post to view this cashdonator-cashdemo box we are creating in action. I placed it at the bottom of the article.
Where & how do you place the box on the article ?
There are two ways to place the box on any article;
- Auto placement.
- Using Shortcode.
In either way, the article must be attached to the box first. More than one box can be attached to a single article. While an article can receive many boxes, a single box can as well be attached to many different articles.
So let’s see how to automatically position a box on an article;
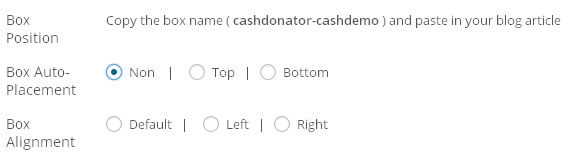
Now, for your box to be automatically placed on your article, you need to tell CashDonator where to place it – Top left, Top right, Bottom left, bottom right.
NB: For boxes that have the full length of your post content area, you must select the Default Box Alignment option. That will perfectly fit your box on your chosen position (top or bottom).
To manually place your box on your content area (anywhere else apart from top and bottom), copy the box short code (which is also the box name) and paste where you want it to be. However, you must set the alignment – Default, Left or Right.
Creating Hyperlinks in the Box!
You are able to add links anywhere in the box with the <a> htlm anchor tag. However, the plugin provides for a default link which is appended to the description. Remember I mentioned above about adding the url of the product.
Scroll down to the bottom of the form where you have “Button text” and enter the anchor text in that form field.

Attaching your box to many articles!
I mentioned above that a single box can be attached to as many articles as possible. After publishing your article, go back to your box editing page, select the article and just click “Add”.
The box automatically will be attached to the article. You can still use the shortcode to place the box anywhere on the article body.
NB: If the article does not show up on the list, select the month and year you published the article. That will pull up all the articles published in that month. Select the article you want from the list and click to add.

Previewing and enabling your blog!
The preview function helps you have an idea what the box will look like on your blog. Do your adjustment until you are comfortable with what you see on the preview page.
NB: After every adjustment, you must SAVE the box before previewing. Without this, the changes will not take effect on the preview page.
The final thing you must do to have the box show up on your articles is to enable it. Check the box and save. If your box still does not show up, check to make sure you have selected the appropriate box type.
![]()
Promote CashDonator and earn commission
You can become cashdonator affiliate and earn 50% on sales. The affiliate program is managed by Clickbank. Signup to Clickbank, then go to this page for details.
Grab your Clickbank affiliate link, go to each box’s editing page and paste the link in the “Your CashDonator affiliate link” form field.

Don’t also forget to visit the docs page for a bit more on how to create these boxses. Click here for more!
Grab your copy of CashDonator
You can set this plugin on your blog and start creating your boxes right this moment. Don’t publish your next blog post without a Cashdonator money making box on it.
For the sake of this post, I’m giving a discount of $10. So you can access CashPro (the unlimited license now for just $17. All you have to do is locate the CashDonator box above, on this article. Click the Paypal button to buy.
Let me know what you think about it in the comment box
Comments are closed.