Do you know how to use Pinterest for Blogging?
If you are like me, and you’re a serious blogger, then you probably try to use every single resource out there that can help you bring traffic and potential clients to your blog, even better if it’s Free.
Social networks are actually one of the main tools used by bloggers and marketers every day, in order to grow their audience, build their brands and create more awareness for the products they promote.
Also, check out: How to Make Money With a Blog: The Definitive Guide For Beginners
But let me tell you something that you’ve probably not noticed yet, Pinterest is not a social network platform, Pinterest is actually a search engine. Yes, just like Google.
Let me explain this in a different way…
When you share content on social media networks, such as Twitter or Facebook, your content stays visible to other people only for a determined time frame, and only the users who were connected at that time will be able to view your content.
Twitter, for instance, will usually keep your content alive for a couple of minutes, unless there is some interaction like re-tweets or likes, that will probably extend the visibility of your content.
With Facebook, your content can stay alive for a longer period of time, like a couple of days and maybe a week or two if there’s interaction as well, such as likes, shares, and comments.
Pinterest, however, works in a totally different way. When you share content, it can stay visible to other people for several months and even years, if your content continues to get pinned by others.
Another difference that sets Pinterest apart from social network platforms, is the fact that social networks use the #hashtag as a way in which users can search and find content. With Pinterest, on the other hand, you can use keywords so that your content can be found by your target audience.
Clear enough?
With that being said, if you want to learn how to use Pinterest for blogging, the first thing you have to do is look at the way in which you’ve been using it so far and start making changes that will also change your results, big time.
Let’s get right in…
How To Use Pinterest For Blogging
1. Use a Business account:
If you already have a personal account on Pinterest, just remember what I mentioned at the beginning of this article, Pinterest is not a social network platform, so it’s not for you to share the things you like and socialize with others, indeed, there are no social activities like chat, likes, etc.
You need to switch to a business account so that your brand can be well represented in front of your audience. This you will also give you access to the analytics tools in which you’ll be able to see the metrics for your account, which will help you to know if you are sharing the right type of content to attract your target audience.
Here’s how you do it:
Once you login to your Pinterest account, you’ll be able to see these three little dots in the upper right corner, you just have to click on it and then click on “Upgrade Now“, don’t worry it’s totally free so they won’t ask for your billing info.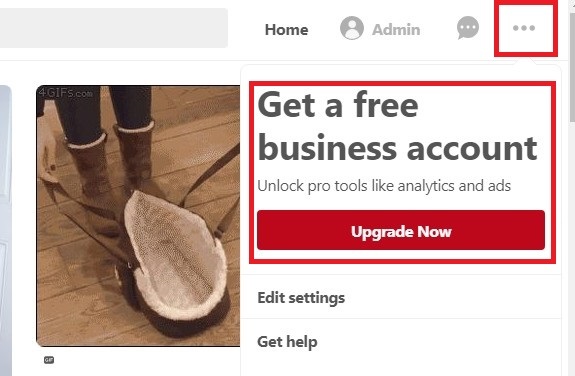
After you click on upgrade now, then you’ll have to fill out a form with your Business name, your Business type and also your business website URL.
Now, my advice when filling out your business name is that you also include your keywords so that it’s easier for people to know what your business is about when they look at your profile. Also remember what I mentioned before if you want to use Pinterest for blogging, you should use it as a search engine, so use keywords.
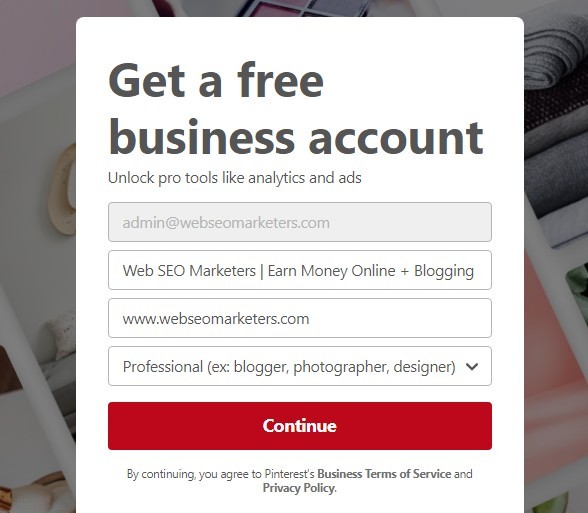
Don’t forget to click on continue, and then that’s it… Now you have your business account, let’s see what’s next.
2. Setup your Profile and Claim your Blog
This part is actually very simple so I’m not going into so many details about it.
Just go to your settings and make sure that your “About you” explains very clearly to your audience who you are, and what you do. Also be sure to include your keywords there as well, this is going to help your audience to find your profile.
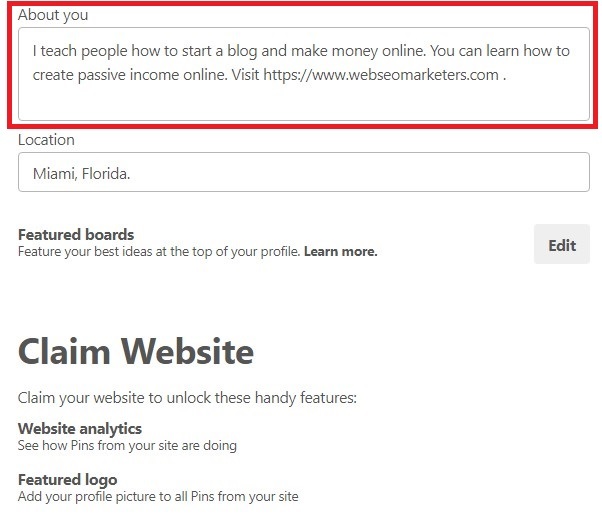
Also, take a look at the “Claim Website“, you just have to type in your domain and hit “Claim website” they’ll give you an HTML code that you can paste on your blog’s <Header> section, once you added the code to your blog, just hit next and they’ll send you an email to verify whether your blog was claimed successfully or not.
3. Become a Content Curator of your Audience Interest
Here we’re talking about how to use Pinterest for blogging, so we should understand very clearly, that Pinterest is not about you and the things you like, is all about your audience and the things they like and they’re searching for.
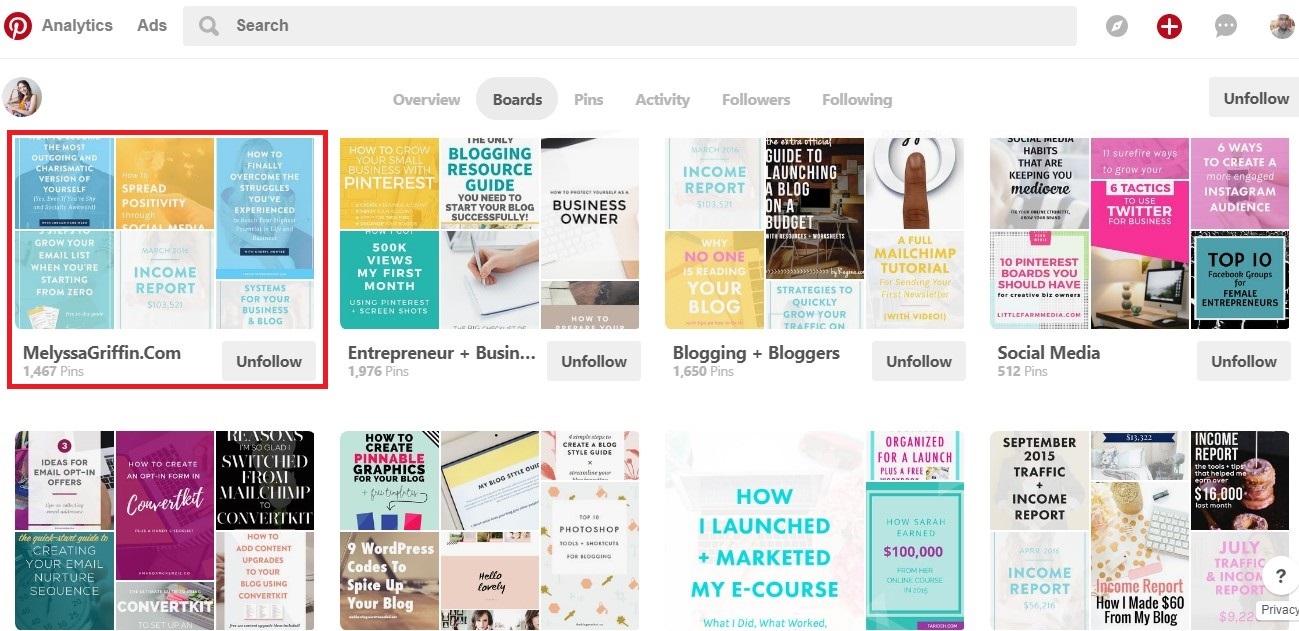
That being said, your very first board on your Pinterest profile should have only content from your blog, that’s the very first board people is going to look at when they get to your profile, so you should only include your own content.
With the rest of your boards, you should be curating other people’s content based on the topics that you know your audience is already searching for. So think about your target audience and their interest, this should give you plenty of ideas about what boards you should create.
Another tip that also works, is to name your boards with keywords. Yes, those keywords that your audience is already searching for.
Take a look at how Melyssa does it… You can see her very first board, with only her own content, and everything else is boards that she created in order to curate content based on her audience interest.
And just to give you an idea, she’s already getting about 200k monthly reviews on Pinterest and a ton of traffic to her blog as well.
4. Use Pinterest Friendly Images
As you probably already know, Pinterest is very visual so you must make sure to use nice images that attract your audience immediately. If you don’t know where to get pictures or your not a designer, you can use Canva which is a great tool to edit images for Free.
Try to always use large titles and bright colors, the vertical images have greater re-pins than the Horizontal, so take that into consideration. And don’t forget to add a pin-it button to your blog so people can pin the images directly from your blog. I recommend Social Warfare Plugin.
• Optimize your images with large, vertically-oriented titles for more impact.
• Link your images to your blog or to the content of your post. This way if the person is interested in your content you just have to click to get to your site.
• Add images in all your posts, so that people who arrive at your blog can save on their boards.
• Make sure that your images are consistent with your brand (colors, image type, typography, etc.) a good image is a key to getting out on Pinterest.
5. Use SEO Techniques
If you are going to use Pinterest for blogging, like I mentioned before, you need to remember that Pinterest is a search engine like Google, so you have to optimize your Pins to be found and the best way to do it is using SEO.
Where should you use keywords?
• The title of the post (at the time of pin, is saved with the title of your post).
• Post URL.
• In the title of the image (when you make the design, make sure to add your keyword to the title).
• In the pin description and board description (before you save a Pin or Board, add a description including keywords, do not use #Hashtags).
• In the image name (when you upload your image to the post, make sure to include your keyword in the name).
6. Enable Rich Pins
Rich Pins allow you to have your website name and icon displayed below the Pin image, this helps you to get the users easily directed to your blog.
Let me show an example…
This is how a Rich Pin looks like:
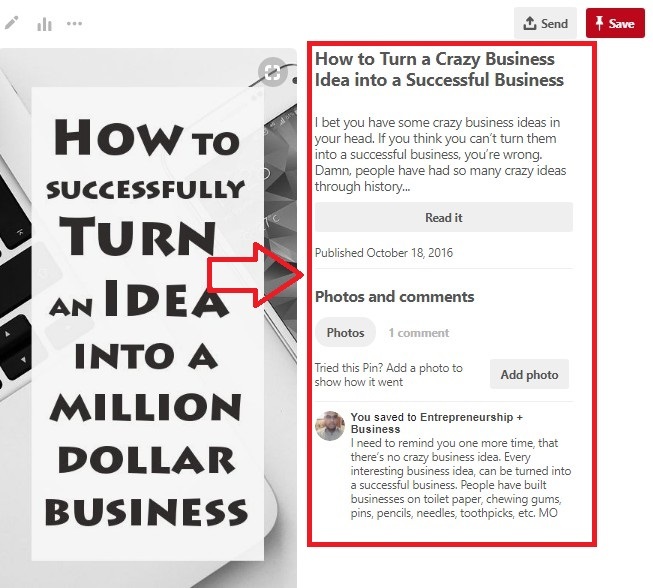
As you can see, there’s a nice tittle added to your pin and also a nice description that includes keywords. This information is usually taken from your article’s Meta Title and Meta Description if you use the Yoast SEO Plugin.
Here’s how a not Rich Pin looks like:
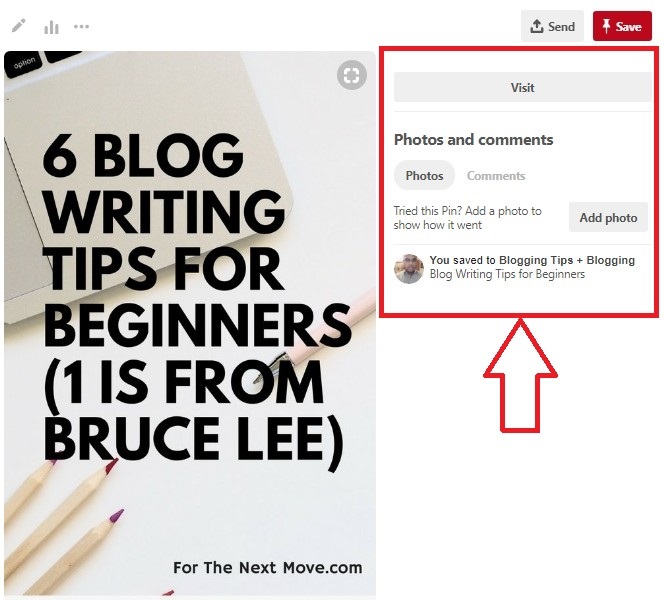 Do you see the difference? Which one do you think is going to get better results and drive more traffic to your blog? Obviously, the rich pin will perform better.
Here’s how to easily enable Pinterest Rich Pins:
1. Install YOAST SEO Plugin
Pinterest Rich Pins requires you to add metadata info to your site, the Yoast plugin adds these for you and it’s very easy to set up. If you already have this plugin installed then you’re good to go, let’s check the next step.
2. Validate your Rich Pins
All you need to do here is to go to Pinterest’s Rich Pin Validator and plug in a link to any blog post on your blog (it can’t be the link to your homepage). Once you entered a valid URL for any of your articles then just click on “validate.”
Once you’ve validated correctly, you should see a message saying “your pin’s been validated!” , Then you have to click on “apply now”. You’ll see a pop up with your website’s domain and “HTML tags” selected, click on “apply now” once again, and that’s it. Now you have Rich Pins activated.
7. When do I see the Results?
Once you start implementing this strategy with your Pinterest account, you should start noticing results in just a couple of weeks. It doesn’t mean that you’re going to start receiving massive amounts of traffic in 2 to 3 weeks, but you should definitely start seeing more traffic than you were getting before.
Want to get thousands of visitors from Pinterest using this strategy?
If you want to drive a huge amount of traffic from Pinterest in a couple of months, make sure to stay active on your Pinterest account, curate content that your audience is already searching for, remember, Pinterest is not about you and the things you like, but about your audience and the things they’re searching for.
Other helpful resources:
- How to get free website traffic from specific countries or cities
- 5 Evergreen Ideas for Attracting More Website Visitors
- WhatsApp Share Button ~ How to drive web traffic from WhatsApp!
That’s it for now, I hope you’ve really enjoyed this article. If you did, then please don’t forget to share it. Also, leave your comments and questions below and I’ll be happy to answer!!
Comments are closed.