Exit Intent is basically, an Internet marketing technology that monitors mouse behavior of website visitors and detects when they are likely to leave the website or web page.
The intention of website readers can easily be read following the direction they push their mouse cursor. When they move their mouse pointer to the close button of the web browser, their intention to close the window is quickly and easily deciphered.
Exit Intent technology comes in at this point to decide what to do with the reader who intends to leave. What generally it does is trigger a lightbox with information intended to hold the reader back from exiting. This lightbox is generally referred to as Exit-Intent Popup.
Some Exit-Intent platforms have more sophisticated and accurate predictive capabilities. They ain’t only limited to mouse movement. They use behavioral and environmental metrics and machine learning to predict visitor’s intention to exit.
What is Exit Intent in a nutshell?
[pullquote align=”normal”]It is a process to predict that someone is about to leave your website, so you can then change their experience to keep them on your site. [/pullquote]
From that simple definition, you are already beginning to understand why it’s important not to neglect implementing the technology on your blog or eCommerce website especially if you’re thinking to increase email signup or reduce cart abandonment.
Let me tickle you a little more:
Every reader on your website will leave at one point. Some will, after taking the appropriate steps (completing a purchase, signing up to your list, etc) Others may just click off abandoning a crucial process.
70% of people who leave may never return. Considering cost associated with customer acquisition process, not taking any further steps to try to retain them means a big joke to me.
Most website owners are now embracing exit-intent in an effort to convert additional 1 to 4% of visitors into subscribers and buyers.
Exit Intent Popups give site owners the power to recover their abandoning visitors and grow their business. But how do you leverage the power of this technology ?
Recommending OptinMonster’s Exit Intent technology!
There are many Exit-Intent technology tools out there. But obviously, OptinMonster is the leader based on predictive capacity, implementation, customer ratings, customer service and price.
–> Check out OptinMonster here < —
OptinMonster’s SMART behavioral technology allows website owners to convert additional 2 – 4% of their readers to email subscribers and then buying customers. Before I show you exactly how to get this done on your site, let’s look a little further into some use cases.
Take a look at some Exit-Intent examples
Exit Intent for content marketers
One of the ways for bloggers and content marketers to get the best out of their content marketing efforts is to build a list of email subscribers.
“The money” as they say “is in the list”. Traditional list building methods are beginning to fade out. Exit-Intent on the other hand is an intelligent last attempt to lure readers into giving you their email while you increase email signup.
As a blogger, don’t allow that reader go away without offering him/her something different. That’s what Exit Intent is all about. Once the readers intends to turn your page off, the technology allows you to offer something related to the content being closed.
Later on in this post,we will see exactly how to create specific exit intent lightboxes or popups for different blog posts or pages on eCommerce sites.
If for instance, you’ve written an article on Social Media, SEO, Web Traffic, etc, and a reader attempts to quit without clicking on a link, Exit Intent allows you to do one of these three things:
- Make an intelligent and content-related offer to your reader to signup to your list.
- Redirect the reader to a closely related post on your blog. This is an amazing way to reduce bounce rate.
- Recommend an affiliate product you promote. This helps increase sales and commissions.
[page_section template=’1′ position=’default’]
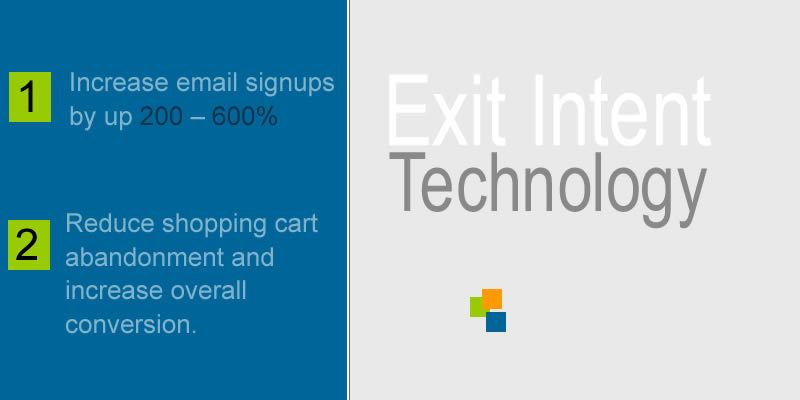
With exit intent, publishers are able to increase email signups by up 200 – 600%. See these case studies
[/page_section]
Exit Intent for eCommerce sites
Every eCommerce site is aimed at converting visitors to buyers. The most annoying experience is Shopping Cart Abandonment. That means your visitor has added one or more products to the shopping cart. But at the point of pulling out his credit card to seal the deal, he abandons.
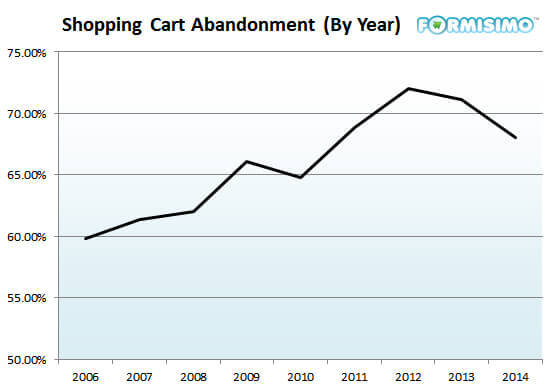
According to Formisimo, the average abandonment rate for an eCommerce checkout is 68%
Maybe your Cart conversion or poor, which is something you have to work on.
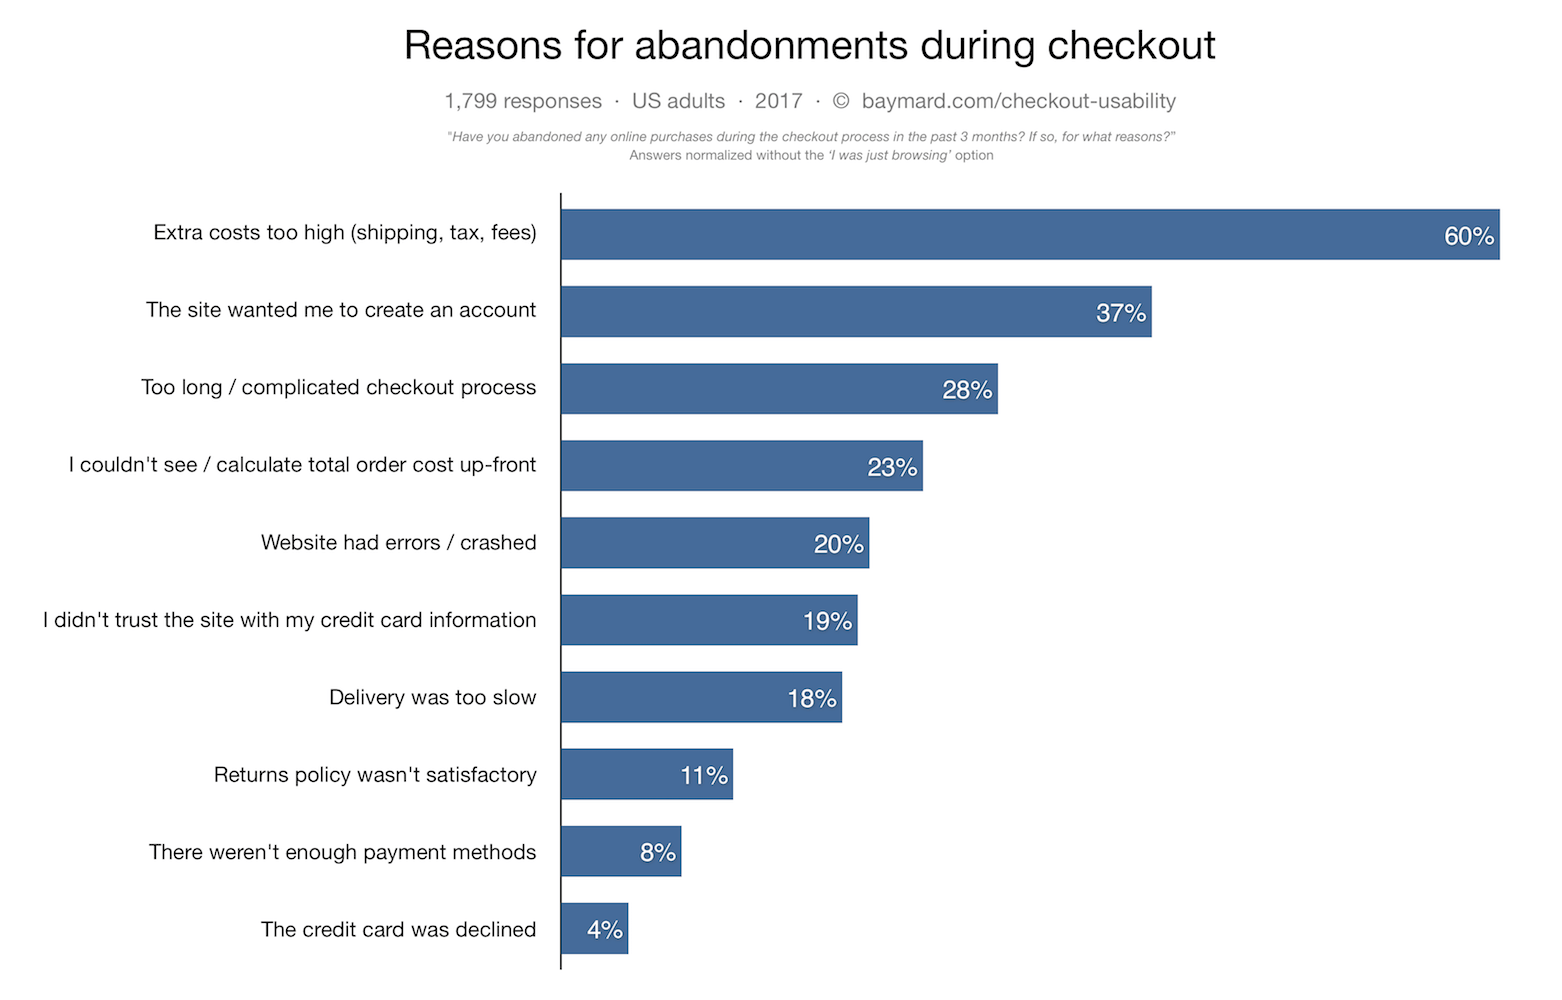
Following a report by, baymard, 60% of buyers abandon the shopping cart because of high extra costs. These include shipping, tax, extra fees, etc.
 But that’s not the point here in this post, to know why buyers quit half-way. We want to be able to interrupt the buyers exiting and try to get their attention to complete the buying or signup to our list.
Here are a couple of things you may offer:
- A special discount to the buyer instantly on the Exit-Intent popup window.
- Ask the buyer to submit his email for a special coupon code.
- Invite the buyer to a chat with a sales/support agent.
OptinMonster’s Exit-Intent technology allows you to create specific popups for different products in your shop. Whether you are using WordPress, Shopify, Magento, BigCommerce, Drupal, Joomla, etc, this will work perfectly for you and basically on all types of websites.
[page_section template=’1′ position=’default’]
Exit-Intent popups have proven to reduce cart abandonment and increase overall conversion. See this case studies
[/page_section]
9 Unique Exit Intent popup ideas with OptinMonster Canvas
OptinMonster’s canvas feature is one of the reasons you OptinMonster is the best marketing and campaign platforms you will need.
The canvas is a blank popup where you can insert any HTML, CSS, JavaScript, and even WordPress shortcodes. This gives you the flexibility to design any idea in an attempt to reduce cart abandonment or grow your email list. According to OptinMonster blog, here are 9 unique exit-intent popup ideas:
- Video Popups
- Custom Survey
- Facebook Like Box
- Fun Quiz or Game Popup
- Related Posts Popup
- Related Product Popups
- Contest / Raffle Popup
- Multiple Field Contact Form Popup
- Donation Popup
Check out this post for details
How to create Exit-Intent with OptinMonster
Creating exit-intent with OptinMonster is very simple.
First, signup here. You will need the Pro account to have access to this feature. This is the best and most affordable package for everything you need to get huge results fast.
Once on dashboard, click the Create Campaign button and select the Lightbox Popup campaign type on the next window.
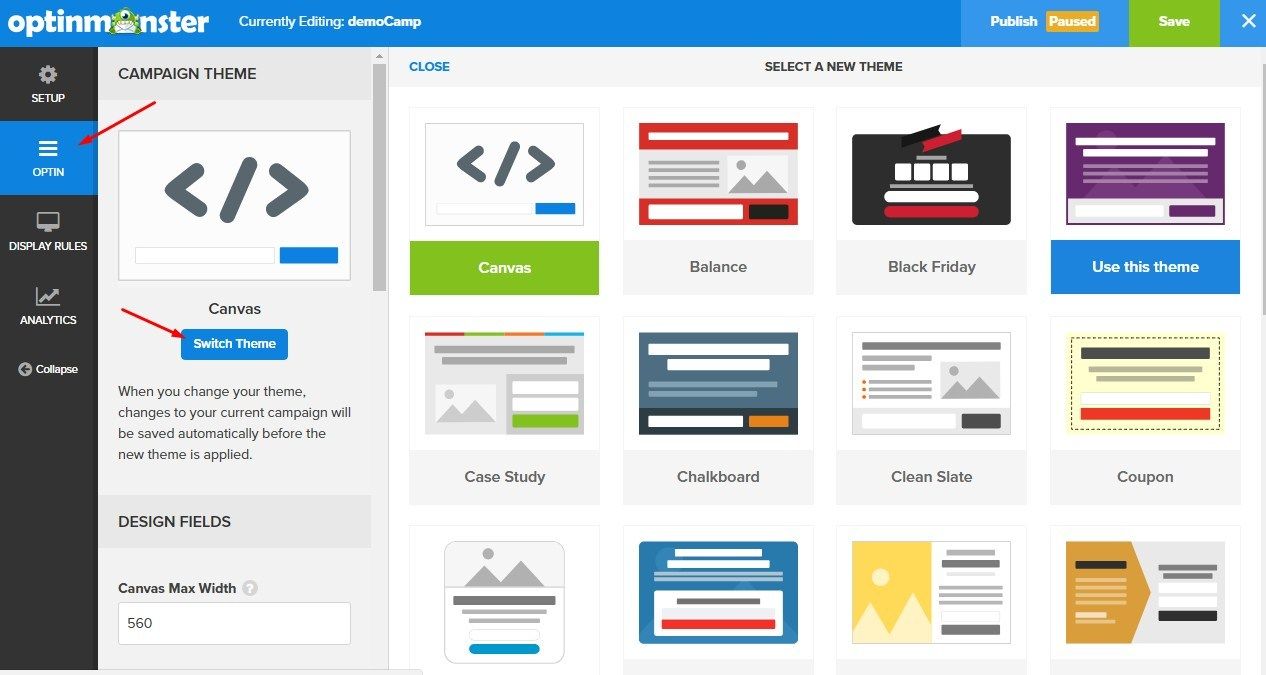
There are different Campaign templates. You may want to pick a preset template and just customize it to your taste. But for the sake of this demo, we are picking the Canvas option. This will allow us create just anything we can think of.
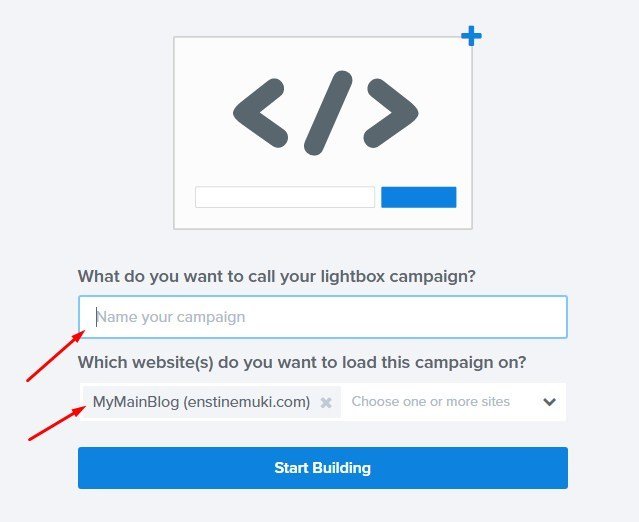
You will have to enter the campaign name (for internal use only) and the website(s) where you intend to run the campaign.
On the next window, there are a couple of things to do. Given that we selected the Canvas blank template, we will be going to straight to pasting a piece of html code to embed a Youtube video
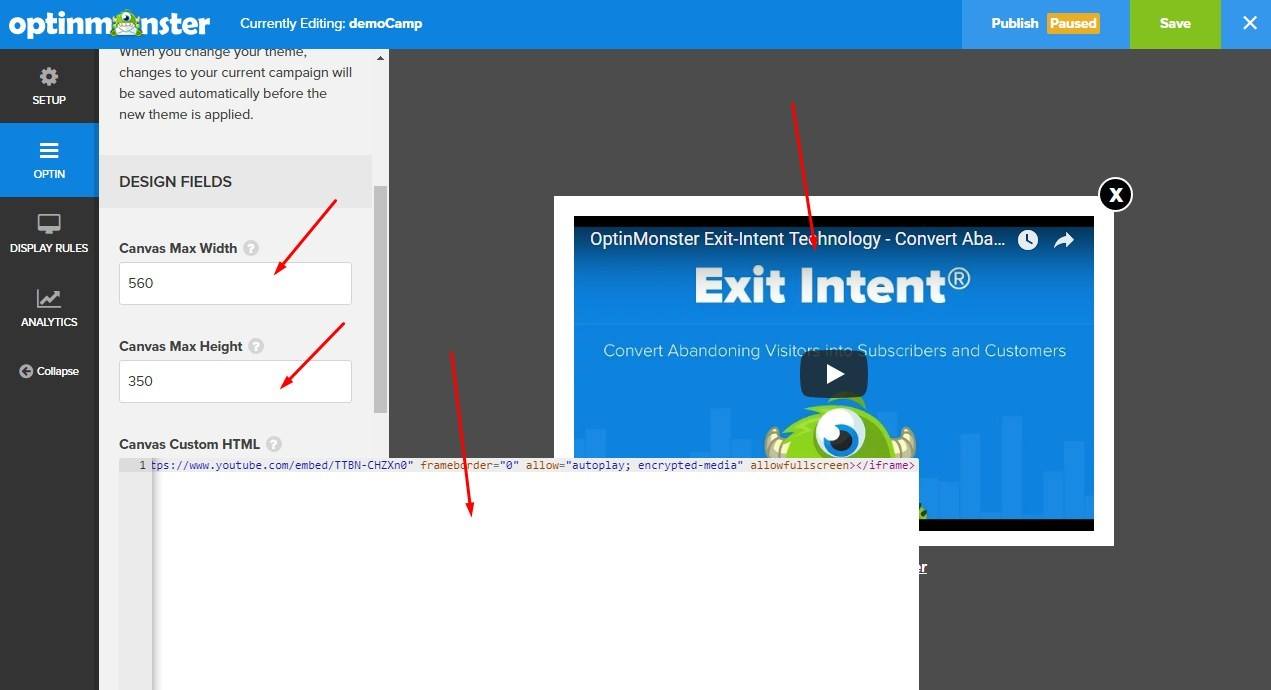
You can adjust the canvas width and height to fit your design. If for any reason you are not finding it easy with the canvas blank template, you can switch to the templates library at any time to pick a theme of your choice:
Linking your Exit Intent popup to an email marketing platform
If you want your exiting readers to subscribe to your list, you certainly will need an email marketing platform. OptinMonster makes it easy to integrate with a plethora of email marketing tools to automatically add subscribers to your lists:
- Active Campaign
- aWeber
- Constant Contact
- Campaign Monitor
- Conversio
- MailerLite
- ConvertKit
- EmailOctopus
- Drip
- GetResponse
- MadMini
- MailChimp
- Infusionsoft
- iContact
- SendInBlue
- SendPulse
- Etc
For a demo, we are going to integrate with MailerLite. This is my most recommended email marketing platform for bloggers and small businesses. Signup here for a free MailerLite account.
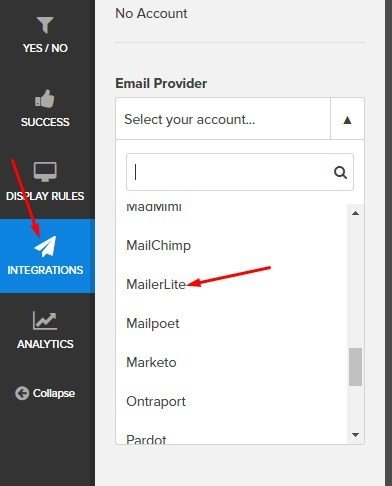
Click Integration and select your platform from the Email Provider list.
Let’s select MailerLite to continue. You will be required to enter your MailerLite API key which you can get from your account. This applies to other Email Provider you may want to use. When fully connected to your email provider, you will be presented a list of your lists (groups). All you have to do is select the group you want to link the exit intent popup to.
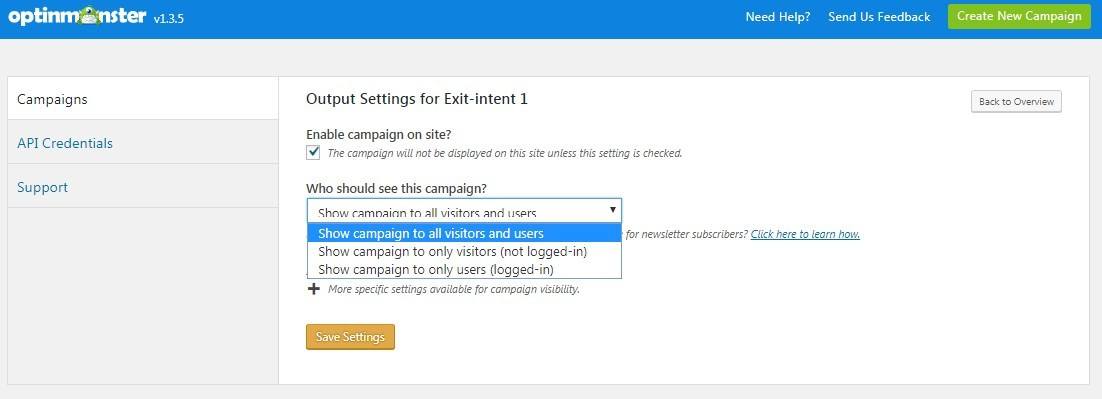
Setting of display rules
We’ve just created a lightbox. But when does it popup? Who should see the campaign (the popup) and when?
We may want it to only display on homepage or any other pages. For eCommerce shop, you may want it to only displace on a certain product details page. In some other cases, you may want it to only display to first time visitors to your website.
Here are some more interesting display rules:
- Display to visitors (new and/or returning) who want to exit (which is what we are focusing on in this post)
- Display to visitors who have scrolled 50% (or more/less) of this or that page.
- Show to visitor who has spent time on your site and has viewed X number of pages
- Display to visitors coming from a specific physical location
- Show to users coming from a specific traffic source
- Show popup to readers on a page that has some specific URL parameters.
- Etc
Show when the visitor tries to leave the site
This is the ruleset that’s our point of focus on this post.
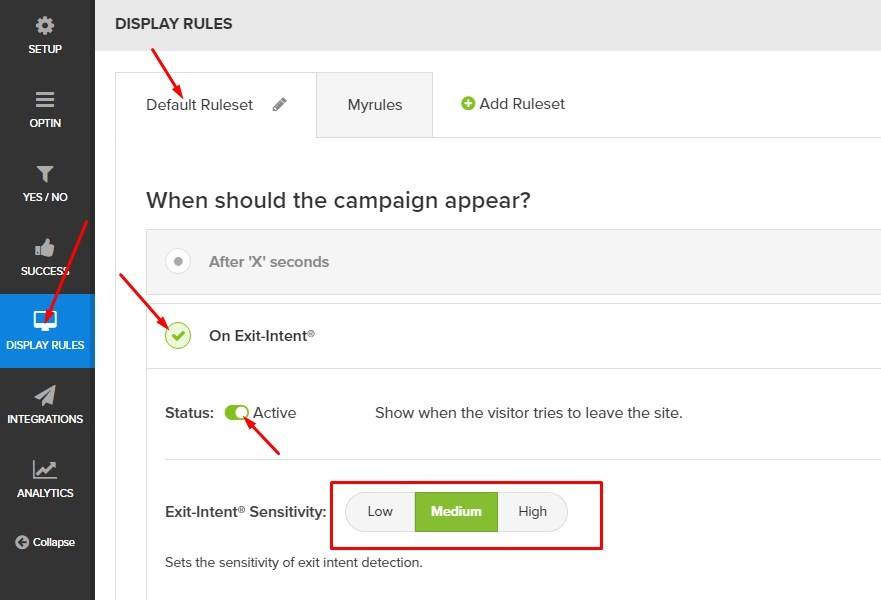
Now, once your lightbox is designed, making it an Exit Intent Popup is easy and straight forward.
Click the “Display Rules” on the left bar. Be sure to be on Default Ruleset. Click to expand the “On Exit-Intent” tab. Here, you simply have to enable the option and set the sensitivity.
Display to first time visitors who leave homepage.
You may want to be more targeted by displaying the popup to readers or visitors who are on your site homepage for their very first time. They want to quit without taking any further clicking action.
NB: This option will also allow you to create popups for returning readers.
Here is what to do next:
- Set the page on our site to show the popup : Home page, inner pages, about us page, product details page, etc)
- Set the popup to only display to new visitors who want to quit.
Now, back to the display rules, locate the “Visitors browsing specific pages” under “Who should see the campaign” section:
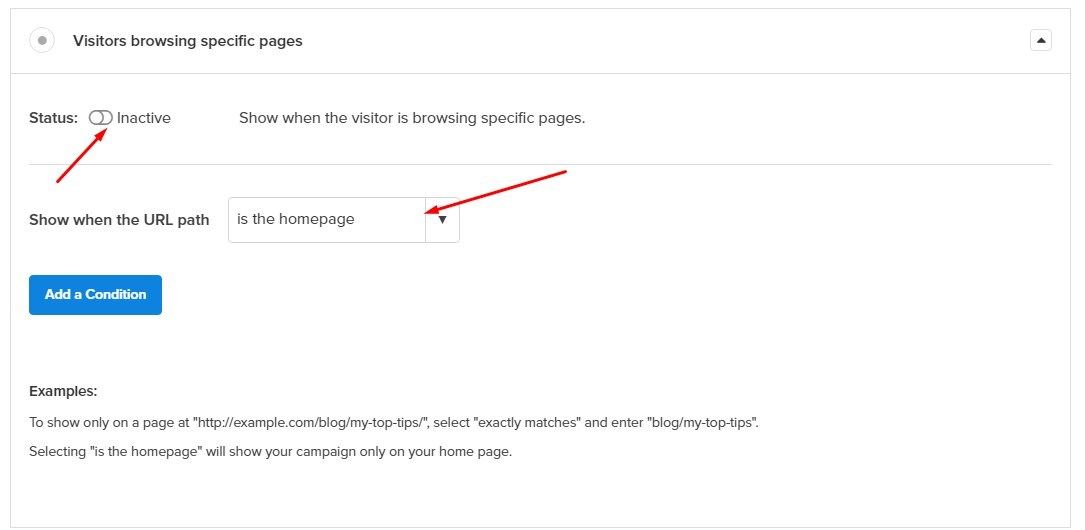
Enable this rule and select “is the homepage” from the list. Note that you can add as many url paths to this rule.
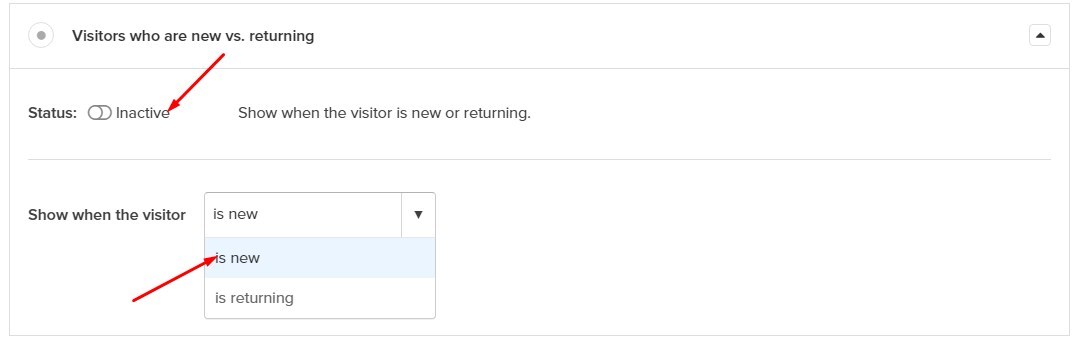
Next, we are got to target first time readers.
Still under “Who should see the campaign?’ section, location the box labeled “Visitors who are new vs. returning”
As simple as this is, it will get the most complex job done. Be flexible and play around with the rules to get what’s best for your campaign. Click the “Save” button when done.
Publish your exit intent popup
Congratulations on creating an exit intent popup with OptinMonster. The next thing is to get it to work on your blog. OptinMonster works with all websites and eCommerce platforms.
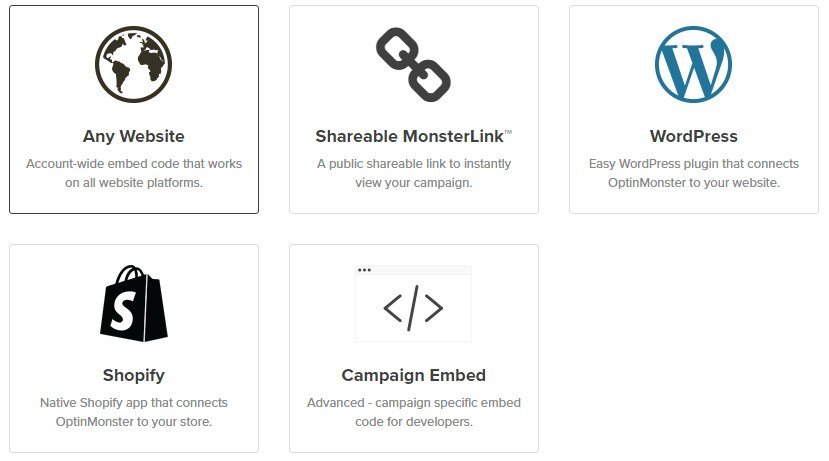
If you are running a website based on custom code, you can simply click the “Any Website” box, copy the embed code and paste just before the closing </body> tag of your website template file.
Using OptinMonster Exit Intent technology with WordPress
If you are running a WordPress site, you have basically two ways to link to OptinMonster. The first which may require some technical know is to copy the embed code and paste on your site.
Somoe WordPress themes allow you to easily add additional tracking scripts before the closing </head> and/or </body> of your website. But for the sake of ease, we are going to be using the WordPress plugin.
While in your account, on the campaign publication page, click the WordPress box as seen above. This will give you instructions on where to get the plugin.
You need your OptinMonster API
The API key will link your WordPress blog to your OptinMonster account:
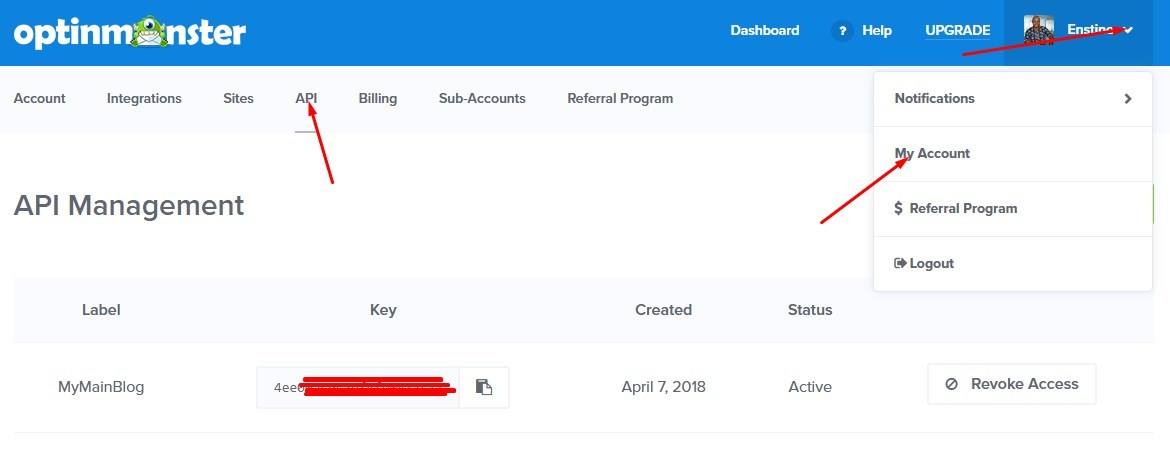
Click your account name -> My Account. On the next page, click the API link. Click “Create New Key” button to generate a unique API key.
After installing and activating the plugin in WordPress, you will be required to enter the API Key. You don’t have any much to do at this point. You only have two things to do:
- Enable the plugin
- Set your campaign visibility.
Signup to OptinMonster here. Drop a comment below and let know what you think. Share the post on social media to help spread the word about Exit Intent.
Comments are closed.