Group Leads is an interesting browser extension (Chrome and Firefox at the moment) that allows its users to turn any new Facebook Group member to an email list subscriber without having to spend on creating a Facebook ad.
Not only are you able to grow your list from your Facebook group with this smart app. You are also able to get new group members data posted automatically to a Google Sheet for further processing.
If you are running a Facebook group, this may be a piece of gold for you, given the importance of collecting and storing email addresses of your community members where you have full control.
Here is what you should know and it’s very important…
Facebook may one day decide to turn off your group without your consent. If this is done, you’ll have your eyes to pour out tears and your hands to raise above your head.
No matter how hard you work to build and brand your Facebook groups and Fan Pages, they still are not your properties. Facebook owns them. Period!
Recommended: 4 Facebook Marketing Tips for Small Business Owners
Start working smart with Group Leads
Few years back, Facebook added a group feature for intelligent marketers to kick their Facebook Marketing to a completely new level.
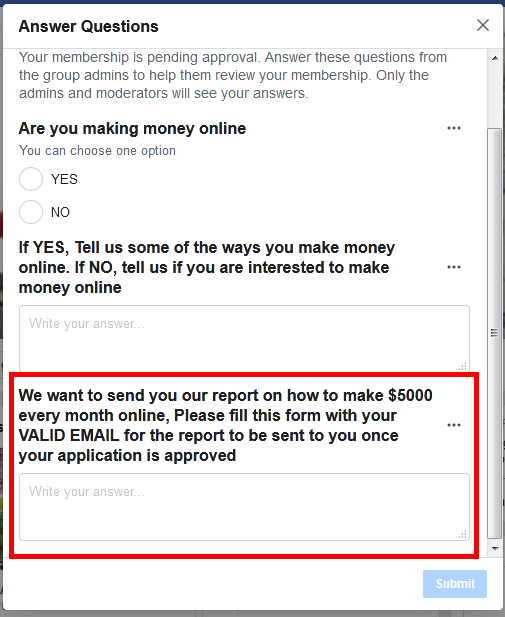
The feature allows you as Group Admin to ask up to 3 questions to everyone willing to join your group. This is what Group Leads capitalizes on to turn your Facebook Group to a massive list builder:
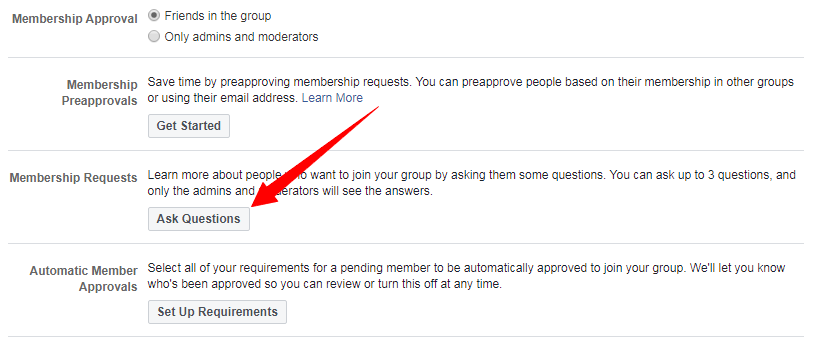
There are 3 question fields (and question types) and you have to be smart. Depending on what your group focuses on, one of the questions should be requesting for the email address of the new members.
Offering an incentive has proven to improve conversion. If you make a promise to send a free gift (report, discount code, free access, etc), you are always going to get more members to submit their valid addresses:
How Group Leads functions
Here is a quick video:
Group Leads does two things:
- Gets data (Name and Email) of your new group members and submit to your Email Service Provider (Your Autoresponder)
- Gets more data from your new members and submit to a Google sheet (details below)
Once you approve requests from new members, their data is automatically posted to these two destinations. Note however that posting to Autoresponders is optional.
Basically, that’s all. But this simple action of picking and posting user data to an external storage location adds a lot more value to your business:
- Like I mentioned earlier, if your group is frozen by Facebook, your business keeps moving.
- According to statistics from numerous sources, email is a more effective sales and communications channel than social Media.
According to research, 44% of users check their email for a deal from a company they know, whereas only 4% will go to Facebook.
Moving your group members to an email list allows you to build a stronger relationship. That’s where Group Leads comes in.
How to setup Group Leads
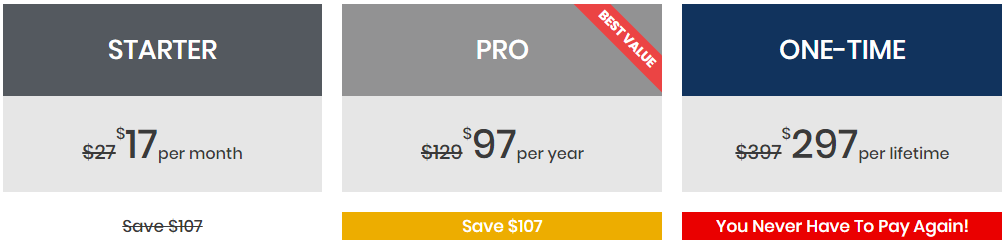
The first thing is to try it for free. Go to the website and signup
There are three packages at the time of writing and each of them comes with a 7 day free trial:
Once you signup, you will be sent a free license code and a link to download the browser app.
Complete installation instructions are available here. Follow the steps to install the Chrome extension. For Firefox users, grab the extension here
NB: the rest of this post will be based on the Chrome version.
Once you have it installed, click the Group Leads Icon in your extension tray to open the app. Enter your license code sent to your email and click to login:

There are three more things to do to add groups to your app and I will show you how:
- Open the group whose members you want to turn to lead
- Connect the group to Google Sheet
- Connect the group to your Autoresponder (optional)
Make sure you’ve connected to your Facebook account and the group you want to add is right open. If you are not on the group page, the app won’t be able to connect to it.
Once the group page is opened on the browser, click the Group Leads logo on the extension tray. This will bring up this window:
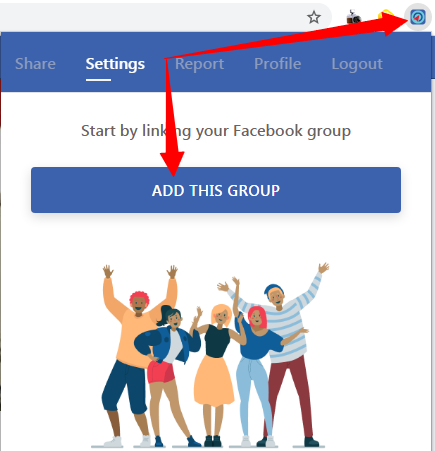
Click “ADD THIS GROUP” Remember if you are not on the group page, you won’t see this button. Once you click the button, the group will automatically be added to the app.
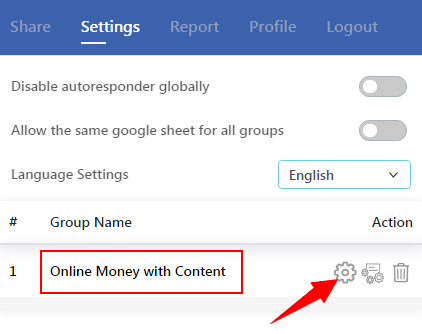
Let’s move on to configure and set it to work. Take note that the group’s name has automatically been copied to the app. Click on the settings icon to get it connected to your Autoresponder and the Google Sheet.
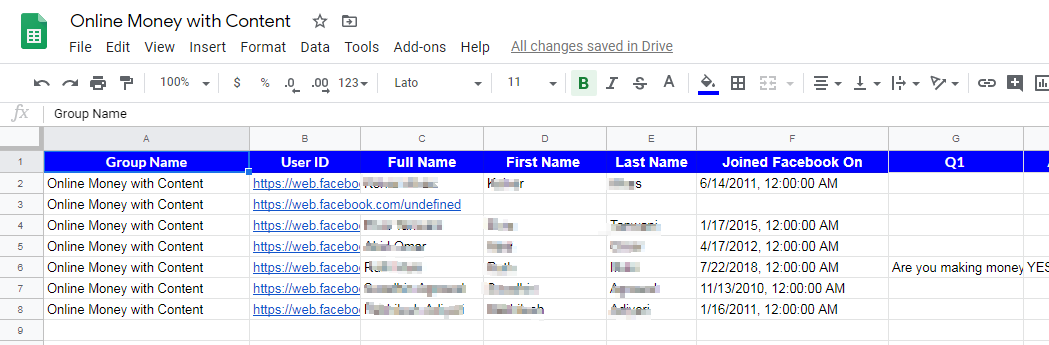
Connecting your group to Google Sheet.
Group Leads comes with a pre-formatted Google Sheet for you to simply copy and use. You will therefore need a free Google Account to move on.
Once you click on the Settings icon, this will pull up this window:
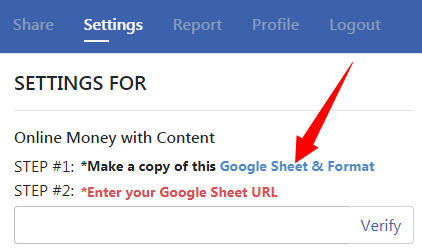
Click on the link in STEP #1. Make a copy of the Google sheet. Copy the link of the copy of the Sheet now available in your account. Paste in STEP #2 and click “Verify”
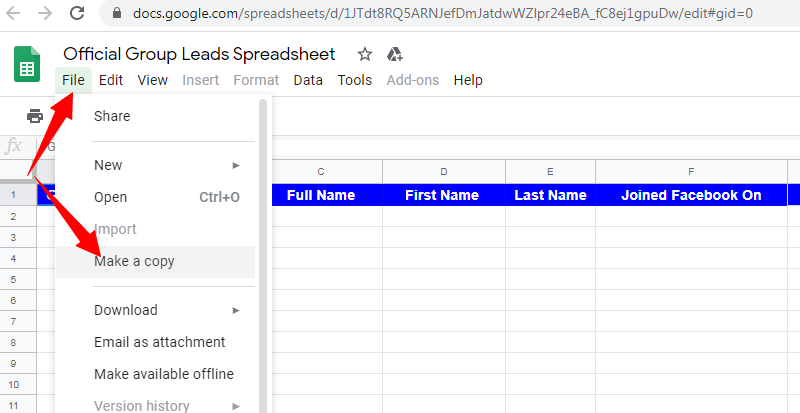
To make a copy of the Google Sheet, Simple open the original sheet (Official Group Leads Spreadsheet), click File -> Make a copy:
On the window that pops up, enter the new name of your copy. I would recommend copying and pasting the exact name of the Facebook Group.
Once the new copy saved, copy its spreadsheet url to the app and click the link to verify:

Note that it turned to Verified once the link was clicked. Don’t forget to click the”UPDATE” button to save the changes.
At this point, every new member you approve on your group will be posted to the Google Spreadsheet. However you move on to process this data is absolutely your responsibility:
Connecting your Facebook Group to an Autoresponder
We just did a great job by connecting a Google sheet to our Facebook Group using Group Leads. Now, let’s hook it up with an Autoresponder:
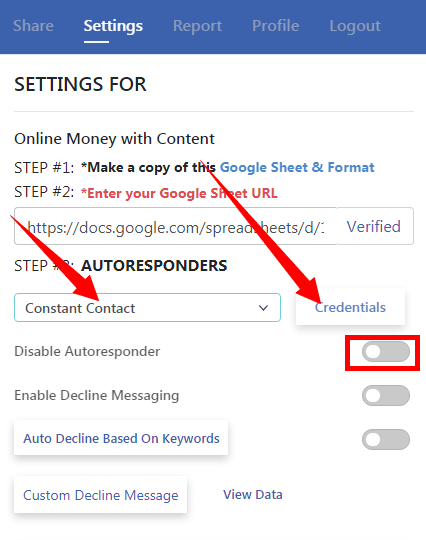
In STEP #3, select your autoresponder (Email Service Provider) from the list and click “Credentials”. You will need to get your APIs and other connection elements from your Autoresponder.
Note that this varies from one platform to the other. For complete instructions how to connect with your Autoresponder, check out this document.
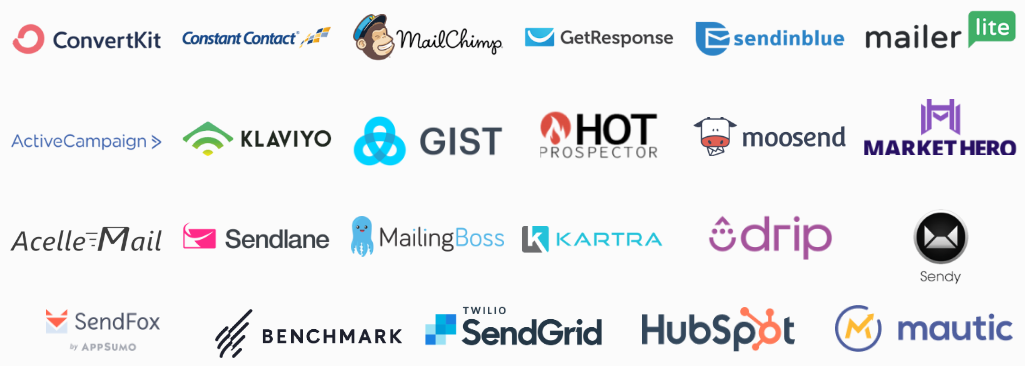
At the time of creating this post, Group Leads works with 24 email Autoresponders and some of these are:
- Active Campaign
- Mailerlite
- Getresponse
- Mailchimp
- Sendy
- Constant Contact
- Sendlane
- Market Hero
- Mailingboss
- Etc
For a complete list and how to get your option supported, click here.
NB: Make sure you do not disable Autoresponder option.
If your autoresponder is correctly linked, Emails and names of your new group members will automatically be signed up.
If you promise any incentives to your new members, make sure you set your Autoresponder to deliver the incentive once the contact is confirmed. You may go ahead and set your ESP to trigger a double opt-in confirmation message is you think it’s necessary.
You may also want to create an intelligent filtering robot that will handle your new list subscribers. If you do not know how to handle this, take my Email Marketing Video Course here.
Manual Approval Vs Automatic Approval
Generally, what happens is that many Facebook Group admin manually approve any requests to join their groups. This is so to make sure members go through a strict verification process to get rid of irrelevant and time wasting members.
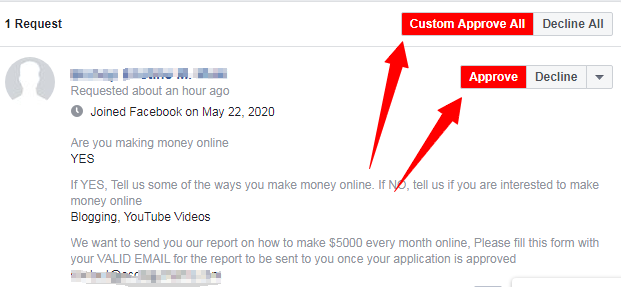
Depending on your settings, clicking to Approve individual requests or Custom Approve All will post the new members data to the Google Sheet and Autoresponder (if enabled):
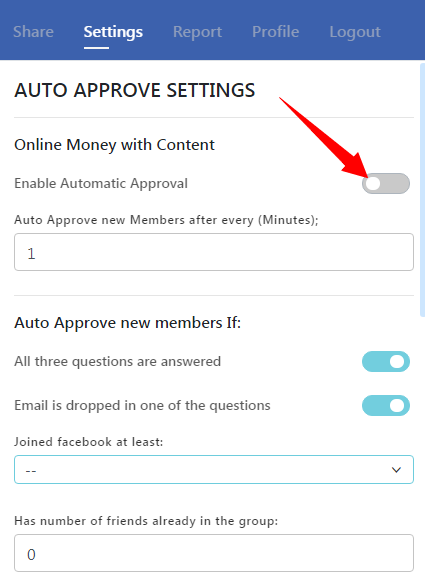
But Group Leads has an option for Automatic Approval to save time. What’s exciting is that you set conditions for the new member to be automatically approved.
So the tool doesn’t just get anyone approved. New members get approved automatically if they meet some requirements:
To enable this, start the application by clicking the Group Lead Logo on the extension tray. Click the Auto approve Settings button:

This will now bring up the different options to create a condition for new requests to be automatically approved. If you have a Facebook that groups rapidly with many new requests daily, you may want to enable this option:
For details on how to turn on the Automatic Approval, watch this video
Limitations of Group Leads Facebook Lead Generation software
Group Leads is awesome app if you ask me. Fully compatible with Facebook Terms, you may want to use it with full confidence. However, there are some limitations you should note right now:
- It’s browser based app and your browser must be open with Internet connection for it to work. It cannot run anytime your browser is closed. If you set it up on your laptop Chrome, you can’t manually approve requests from a different computer. Data won’t be posted to your ESP and the Google spreadsheet
- It has no mobile version being a browser extension app.
Should you try Group Leads for Facebook Groups?
In my opinion, you should give this app a try. Grab the 7 day trial to see how it works. Tech support is fully active. Let them help setup your groups and see how it works. Before you move on, you may want to find out what others think here and here
If you’ve had any experience with it, drop a comment and let’s know about it.
Comments are closed.