BroadedNet is the new generation blog traffic tool for targeted traffic without SEO or Social media. Go here and sign up for free. To install the plugin, simply go to your WordPress Admin -> Plugins -> Add New. Search for broadednet, install and activate.
If you are already a BroadedNet member, be sure to upgrade the WordPress plugin from version 1.0 to the most recent version. Go to your WordPress Admin -> Plugins -> Installed Plugins. The should be an indication that there is a new version for BroadedNet. Just click to ‘update now‘.
In this post, I want to take you through version 1.1 of the plugin. What this does is enable you display just what you want on your blog. I also will be given you coupon code for free credits. The code is available at the bottom of this post.
In version 1.0, articles were randomly picked from the BroadedNet network in selected categories. While this still remains an option, version 1.1 makes it more targeted and does not limit you to one category.
You will be able to search the network and select articles to show on your blog based on keywords, number of credits offered, categories, etc
Creating Custom Widgets in BroadedNet
The first thing to do is create your custom widget in your BroadedNet account and add articles to it.
Remember you can create as many widgets as possible for different spots on your blog. Each widget can only contain 50 articles that are rotated on your blog with the highest credits topping the list.
Login to your BroadedNet account and click ‘My Widgets‘
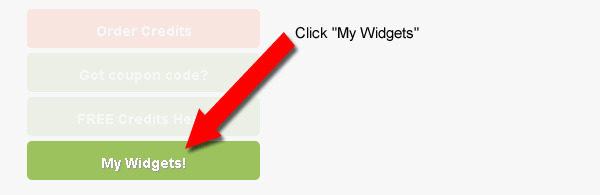
On the next page, you’ll have a list of your active widgets.
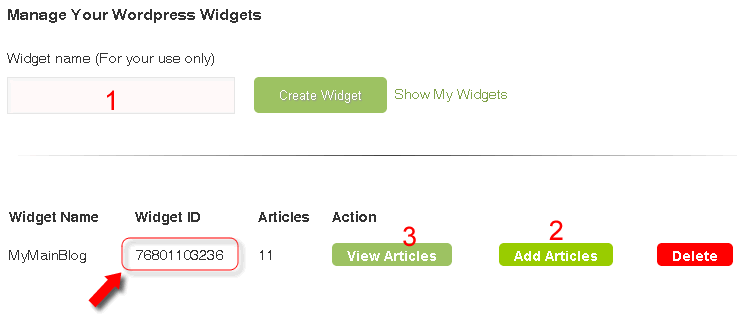
In the image above;
1 – Enter the name of your widget and click “Create Widget“. The name can be anything for your internal use only. It only helps you tell between your different widgets. You may want to use different names to describe different positions on your blogs;
For instance;
- MyMainBlog
- SideBar
- FooterSpot
- etc
2 – Click “Add Articles“. This will allow you search the database and select articles to add to your widget on your blog. From the search tool, you may want to search by keywords, category and number of credits offered. Here below is what the page looks like;
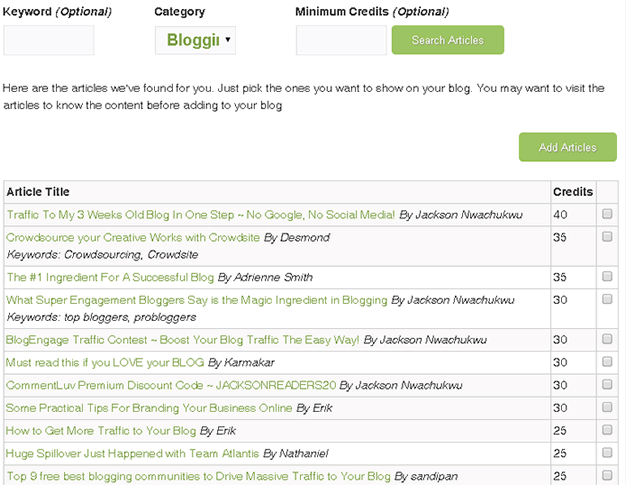
Just check the article you want to show on your blog and click the “Add Articles” button. Those selected articles will show on your blog.
You may want to select articles that offer more credits. However, be sure these are of more quality and are targeted to your audience.
NB: The articles you add to your widget will stop showing as soon as they run out of credits. They will also be automatically removed from your widget if they are deleted or modified by their owners.
You can pick articles from different related categories and add to your widget. I’m thinking of something like Mobile, Technology, etc 😉
View the articles that are currently on a widget
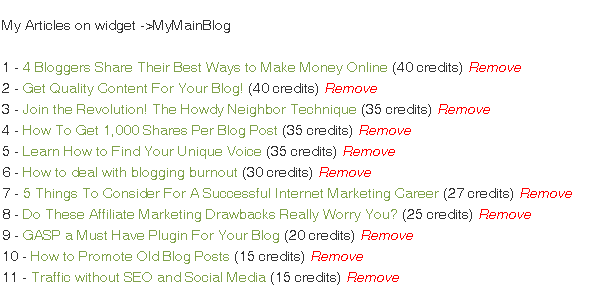
3 – Click the “View Articles” link to view the articles that are currently on your widget. To remove an article from the widget on your blog, just click ‘Remove’
NB: Take note of the Widget ID. This is what we need for the widget to function on your blog.
Install the Widget on your WordPress blog
Now you have created your widget and added articles to it. Let’s see how to show these articles on your blog. Make sure you have broadedNet version 1.1 (or above) installed and activated. If you are still running version 1.0, please upgrade from your WordPress Admin plugins page. Here is how your new widget looks like.
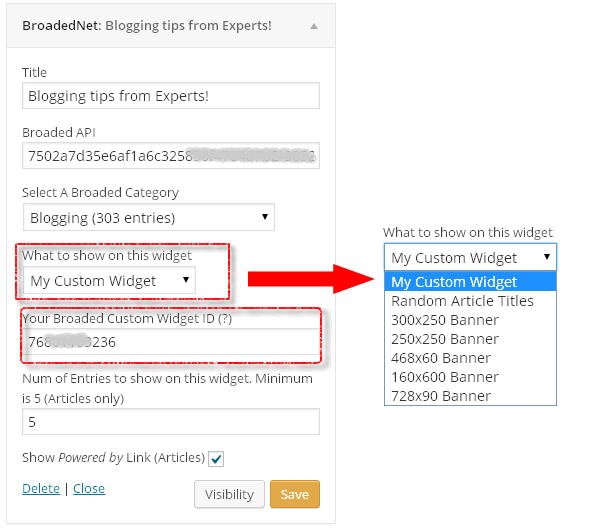
To now add your custom widget on your blog, select “My Custom Widget” option in the “What to show on this widget” field. Next, copy your Widget ID from your BroadedNet account and paste in the “Your Broaded Custom Widget” Field.
NB: You will still need your API which you can get from your BroadedNet Account on the “My Account” page.
The drawback of using custom widgets
The main issue with custom widget is that you have to (from time to time) connect to add more articles to your widgets. I have mentioned above that articles on your widget gets removed each time their owners modify or resubmit them for approval. They are also removed once deleted by their owners. They only go dormant each time they run out of credits.
This can however help you earn more and more credits as you are able to go in only for articles with more credits
Show random articles
Showing selected articles is just an option. You may want to randomly show articles on your blog from selected categories. That comes through the “Random Article Titles” option on the “What to show on this widget” list.
Free credit Coupon
Thanks for helping us share this article on social media. The coupon code is: B11VR
NB: If you want this locker on your blog too, click here for more
What do you think about broaded? How is it working for you?
Please drop your comment in the comment box below
Comments are closed.