Canva is a versatile tool for video and design editing, but it has its limitations when it comes to certain advanced editing features. While Canva allows you to split video clips effortlessly, there is currently no native option to split audio tracks. This can be frustrating for users who want precise control over their audio content in video projects. Let’s dive into why this limitation exists, how it compares to video splitting, and alternative ways to work around this restriction.
Can You Split Audio in Canva?
No, Split Audio Isn’t a Feature!
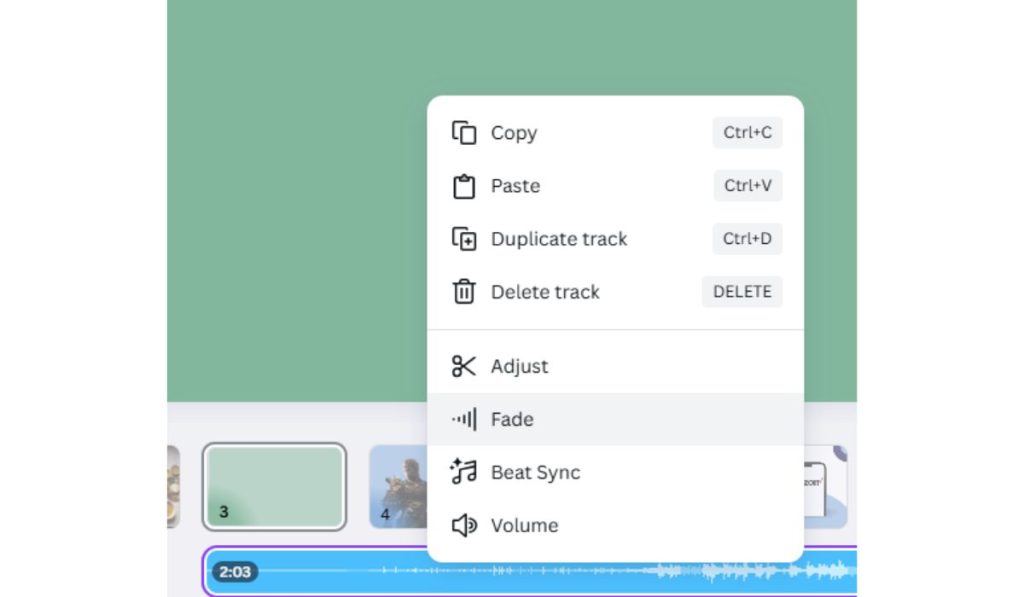
Currently, Canva does not offer a split audio option. When working with audio tracks in Canva, the available options (as shown in the image) include:
- Copy, paste, duplicate, or delete the track.
- Adjust audio settings like volume or fade effects.
- Use features like Beat Sync to align audio with your video timeline.
However, the split function, which would allow you to cut an audio track into smaller sections, is missing. This limitation can hinder precise editing, such as trimming music to align with a specific video moment or creating custom audio segments.
How Does Video Splitting Work in Canva?
In contrast, Canva provides a seamless option to split video clips. By clicking on a video in the timeline, you can easily cut it into multiple parts to rearrange, trim, or adjust. The split video feature ensures precise editing without requiring third-party tools.
Why Video Has Splitting but Audio Doesn’tThe absence of an audio splitting tool in Canva might be due to its primary focus as a visual design tool rather than an advanced audio editor. Video splitting is integral to visual storytelling, but audio splitting might require additional technical capabilities that Canva hasn’t yet prioritized.
Alternatives to Split Audio in Canva
While Canva doesn’t allow splitting audio natively, there are alternative approaches to achieve the same outcome:
1. Trim the Audio Length in Canva
Although you cannot split audio, you can trim its start and end points.
- Click on the audio file in the timeline.
- Drag the edges of the audio track to adjust its duration.
- This method is ideal for basic adjustments but doesn’t allow splitting the audio into multiple parts.
2. Use Third-Party Audio Editing Tools
For advanced audio editing, you can split the audio using external software before uploading it to Canva.
Recommended Tools:
- Audacity (Free): Import your audio, split it into sections, and export the desired clips as individual files.
- GarageBand (Mac): A user-friendly option for cutting and editing audio tracks.
- Online Audio Splitters: Tools like AudioTrimmer or Clideo allow quick and easy audio splitting directly in your browser.
Steps:
- Open the audio file in your chosen tool.
- Split the audio where necessary and export the segments.
- Upload the split audio clips to Canva and arrange them in the timeline.
3. Use Fade and Volume Adjustments for Transitions
Without splitting, you can use Canva’s fade and volume options to create smoother transitions in your audio:
- Right-click on the audio track in Canva and select Fade.
- Adjust the fade-in and fade-out durations to match your visuals.
- Use the Volume option to reduce or increase the audio level for specific moments.
4. Import Pre-Split Audio
If your audio is already split into sections, you can simply upload each segment to Canva. Arrange them on the timeline to sync with your video content.
What Users Can Expect in the Future
While Canva doesn’t currently support audio splitting, the platform frequently updates its features based on user feedback. As video editing becomes a more prominent part of Canva’s offerings, there’s a possibility that advanced audio editing tools, including splitting, may be added in the future.
Conclusion
Canva’s missing audio split feature is a limitation for users who need detailed control over their audio editing. However, with tools like trimming, fade effects, and external audio editors, you can still achieve professional results. For now, use Canva’s video splitting option and pair it with third-party tools to handle audio editing.
Have you found creative ways to work around Canva’s audio limitations? Share your tips in the comments below, and don’t forget to share this guide with other Canva users!

