Today, we will see how to install WordPress and one of WordPress’s strong points is its ease of installation. Even grand ma who can barely move the mouse can install this wonderful blogging script in less than 3 minutes.
This is Part V in our series of creating a money making blog. If you have not been following up, I encourage reading the previous four parts. Start from the front page here
In this part, we are going to see how to install wordpress in 3 minutes or less. There are actually a couple of ways to install wordpress. Most of the web hosting administrative tools offer a set of scripts for quick installation. In cPanel, this is generally available in Fantastico. HostGator’s cPanel makes it a choice between Fantastico and QuickInstall. I will be basing this tutorial on these two script bundles.
NB: If you choose to host with WPX Hosting, you are going to have the best experience ever
If you are not using cPanel (Most widely used PHP server control panel), you can contact me and let’s see how to work this out on your server. Some other web hosts have SimpleScripts and Softaculous. These are all scripts aimed at simplifying WordPress and other scripts installation.
Installing using FTP is outdated and time consuming. It’s a bit more complex than the cPanel click-to-install procedure. Uploading files, creating database manually and following the installation wizard can really be a daunting task. Let’s avoid it.
How to install WordPress in 3 minutes! ~ Fantastico
Login to your cPanel dashboard and locate the Software/services tab. You should figure out something like the image below: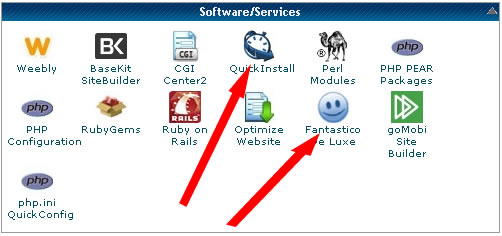 NB: If you are following these tutorials and have not bought your web hosting package, check out this post on which hosting company to use.
– > Let’s go with Fantastico
That means you should click “Fantastico” (as shown on the image above) to move to the next screen.
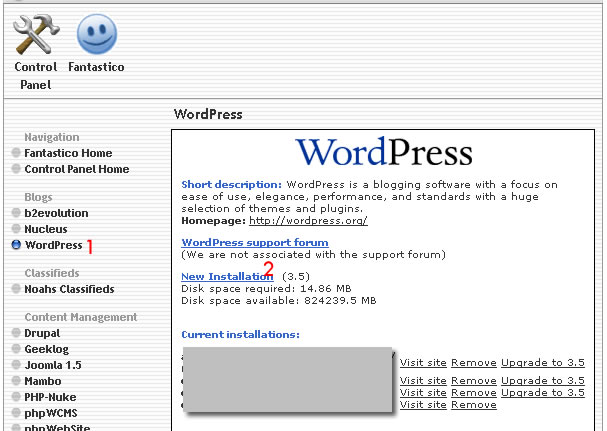
On the next window that shows up after clicking “Fantastico”, click “WordPress” on the left. Next, click “New installation” on the right. (see image above)
You will have the form below show up. Select the domain on which you want to install WordPress on. If you want WordPress to be installed on the root of the selected domain, leave the directory field empty. Otherwise, enter the name of the already created directory to install the script. Next, proceed to filling access data. Avoid using Admin for username and make sure you choose a very strong password. Enter the admin nickname, blog title and description. Note that these can be edited later. I’ll show you so don’t worry. Once you have entered the required info, click to install
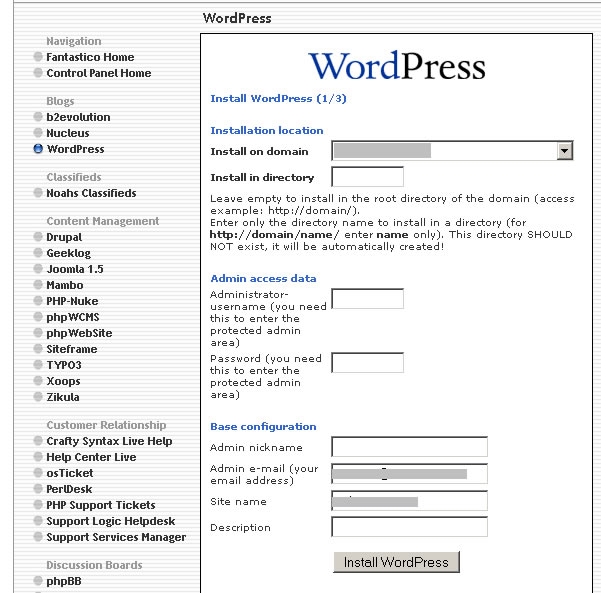
Click “Install WordPress” and on the window that follows, you will simply be required to confirm the installation. I recommend you enter your email to receive the installation data. That will be the final step after installation.
How to install WordPress in 3 minutes! ~ QuickInstall
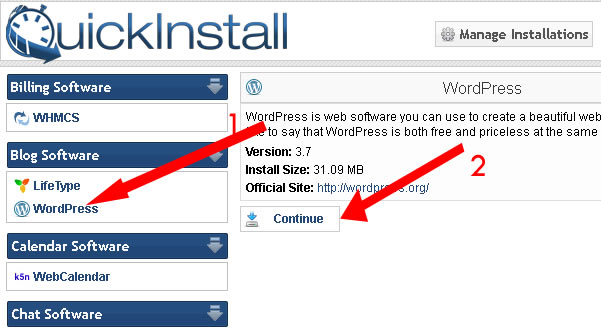
Let’s also look at installing with QuickInstall. If for some reasons you don’t have Fantastico, you should not get frozen. Click “QuickInstall” on your dashboard. The window that follows should be similar to this:
- Click WordPress on the left menu
- Then click the “Continue” button.
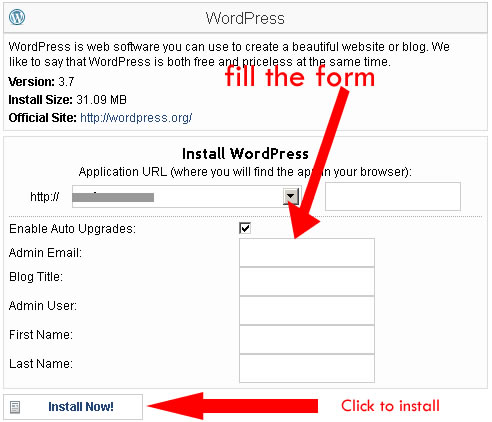
On the window that shows up (screen below), select the domain from the least. Leave the extension folder empty if you want your blog to root from the root, that is https://yourdomain.com. If you want it to run from a sub folder, enter the folder name, for instance https://yourdomain.com/blog.
Enter the Admin email address, Blog title, admin username (avoid admin), your real names (first and last). After filling the form properly, click “install now“.
QuickInstall will also go ahead to install WP-Super-Cache, which is a site performance plugin. It’s highly recommended and I have nothing against that. However, we will go with W3 total Cache which is also a highly recommended performance plugin. Given that the two cannot cohabit, if you install with QuickInstall, WP-Super-Cache will have to be removed as we move on.
Conclusion
Now you have a raw and vulnerable copy of WordPress installed. In Part VI, we are taking care of security. I’m showing you how to lock your copy and configure an automatic backup of your blog.
Check out Part VI here and share your thoughts below.
Comments are closed.